Operator Schedule
The Operator Schedule focuses on tasks that an individual Workcenter Operator performs. There are two important sections to the Operator Schedule:
- Production: This section includes Workcenter tasks that deal with all aspects of the Operator Schedule including starting and stopping Jobs, assigning Inventory Tags, and producing Barcodes.
- Tooling Requests: This section allows users to notify Operators, when a Job is running, in regards to any Tooling problems by creating a Tooling Request in the system.
To view the Operator Schedule screen, navigate to the  tab and click on the
 ![]() icon. The Operator
Schedule screen will be displayed.
icon. The Operator
Schedule screen will be displayed.
Understanding the Operator Schedule
The Operator Schedule consists of three screen sections:
- Workcenter Schedule
- Right Control Panel
- Job Details
Note
If users wish to re-size the three screen sections, simply click on the section borders and drag to your preference. These adjustments will be saved automatically the next time you log into the system.
Workcenter Schedule
The Workcenter Schedule is the main section when the Operator Schedule is opened. Users have the ability to view Jobs that are scheduled, running, and/or completed. To view the Workcenter
Schedule on the Operator Schedule screen, navigate to the  tab and click on the
 ![]() icon. The Operator
Schedule screen will be displayed.
icon. The Operator
Schedule screen will be displayed.

Select the Production Facility and the Workcenter. The system will populate the Jobs for the selected Workcenter in the Workcenter Schedule section of the Operator Schedule screen.
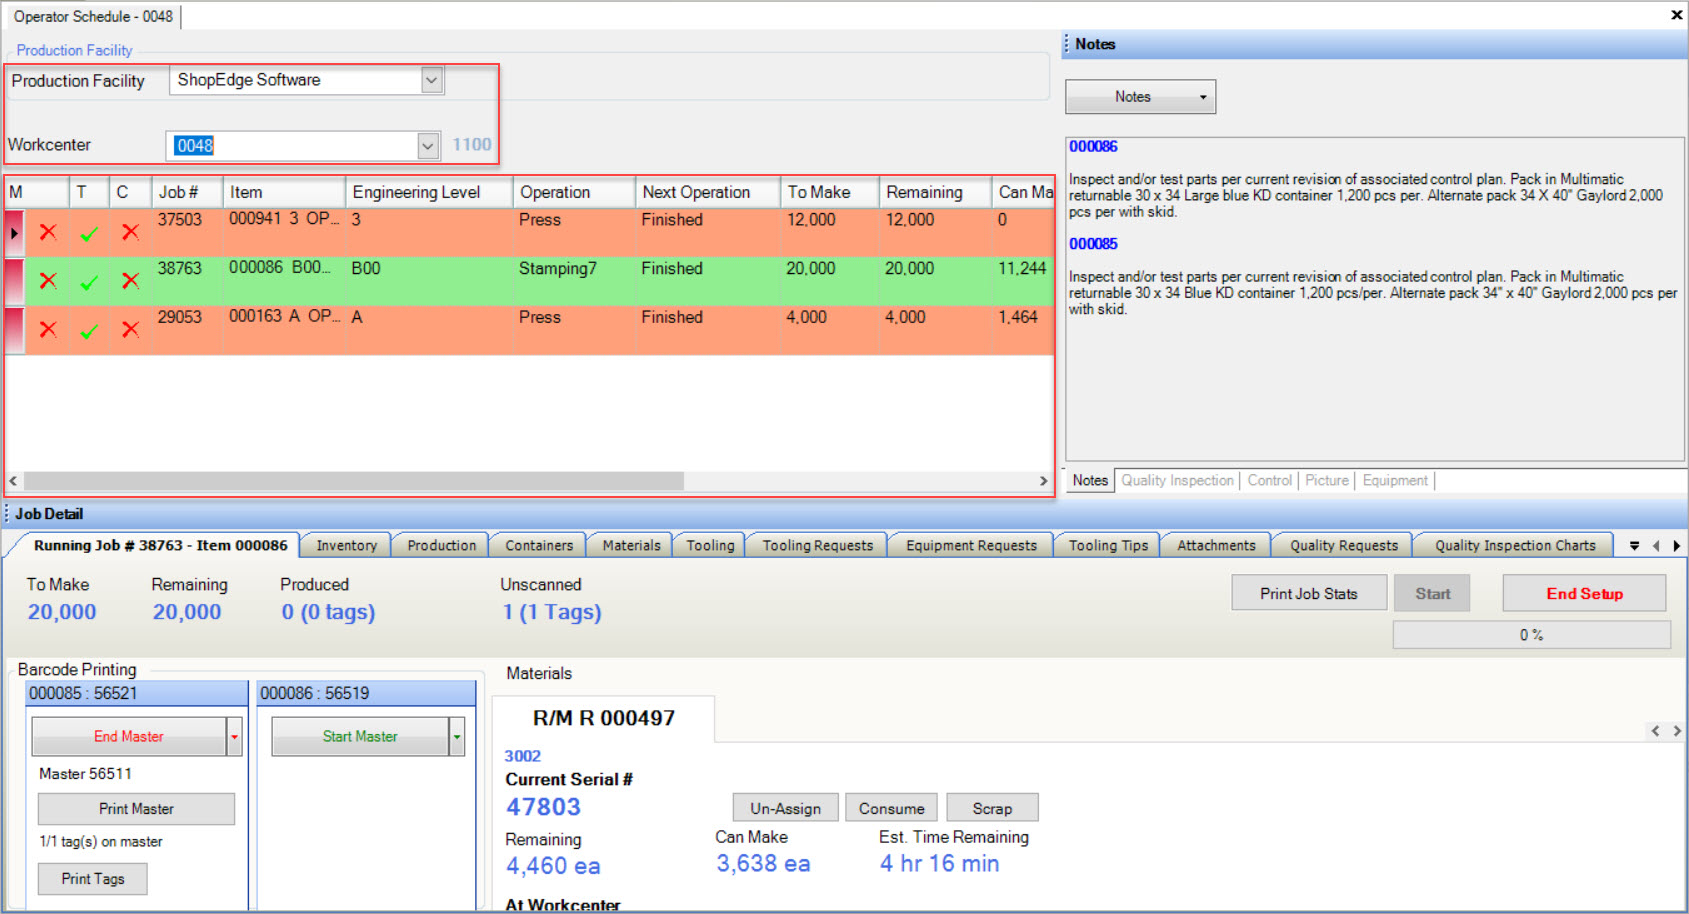
Jobs that are running will be highlighted in green, and Jobs that are completed will be highlighted in red.

The Workcenter Schedule provides important information such as any Material (M), Tooling (T), and/or Container(C) issues, the Job #, Item, Engineering Level, Operation, Next Operation, To Make amount, Remaining amount, Can Make amount, Total Runtime, Std Run-Rate, and the Status.

Note
When changes are made to the Workcenter Schedule (i.e. a Job is moved to a different Workcenter, or up/down in sequence) the Operator Schedule is automatically updated. This is to ensure that the Operator is always up-to-date with any changes and that Jobs continue to being in sequence.
Right Control Panel
The Right Control Panel is located on the right side of the Operator Schedule screen. It includes tabs regarding Notes, Quality Inspection, Control, Picture, and Equipment.
Notes
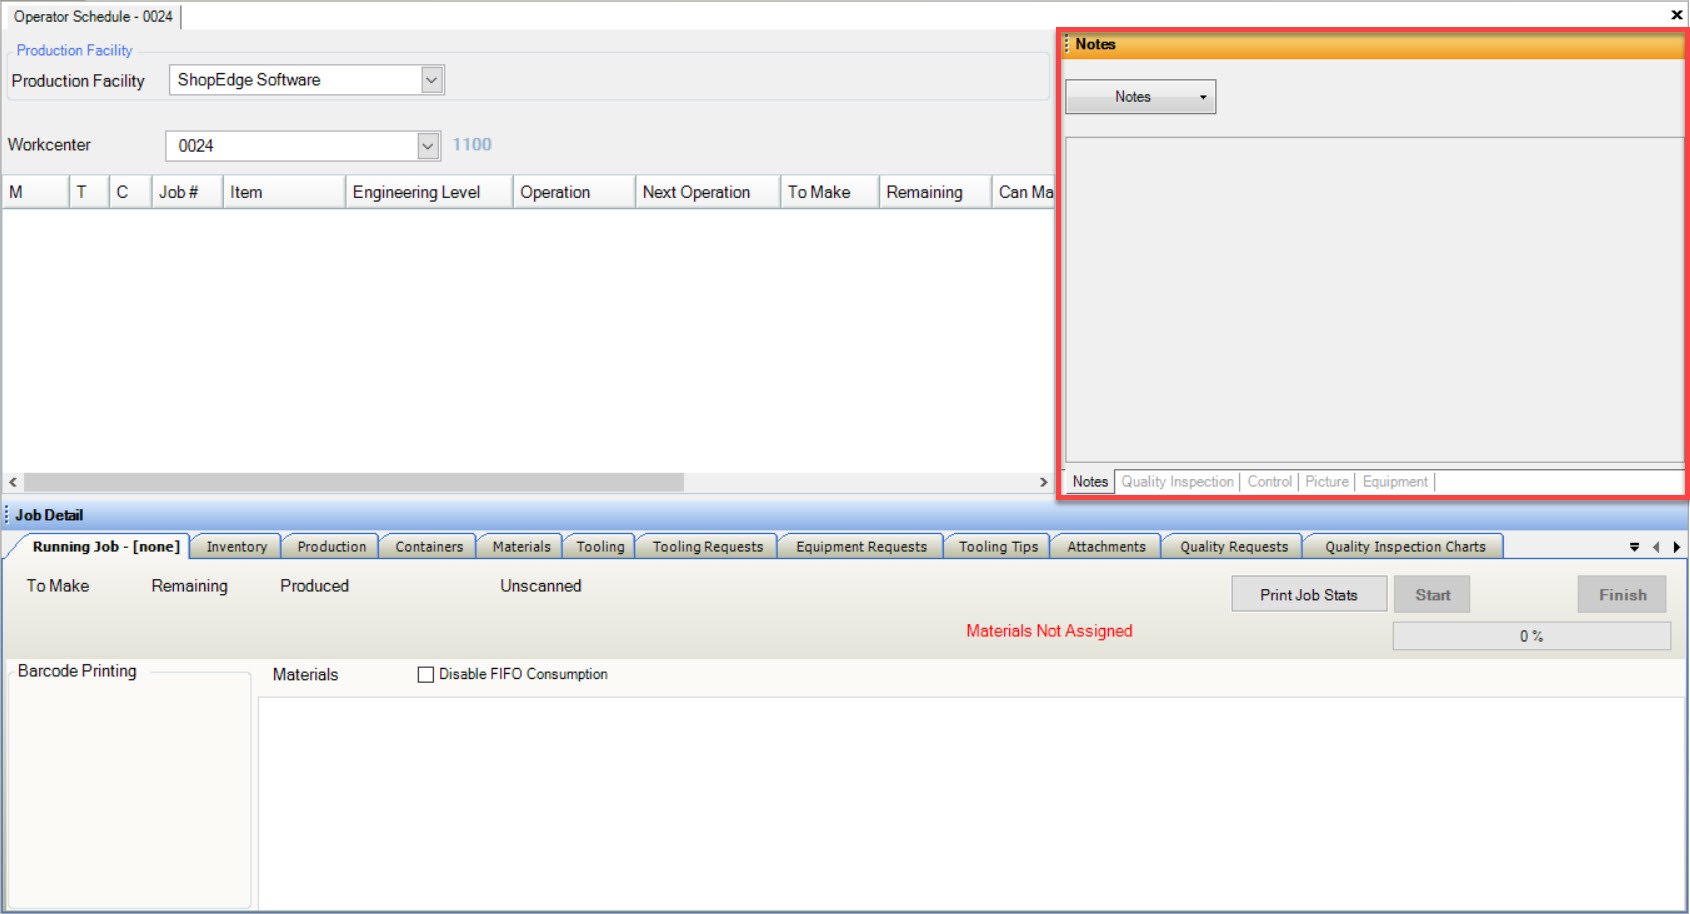
Notes can be viewed by clicking on the  tab located in the Right Control Panel of the Operator Schedule screen.
Users have the ability to view Notes, Setup Notes, or Quality Notes for the selected Workcenter Schedule. To do so, simply click on the drop-down arrow on the  button. Select the Notes you wish to view and the system will populate them accordingly.
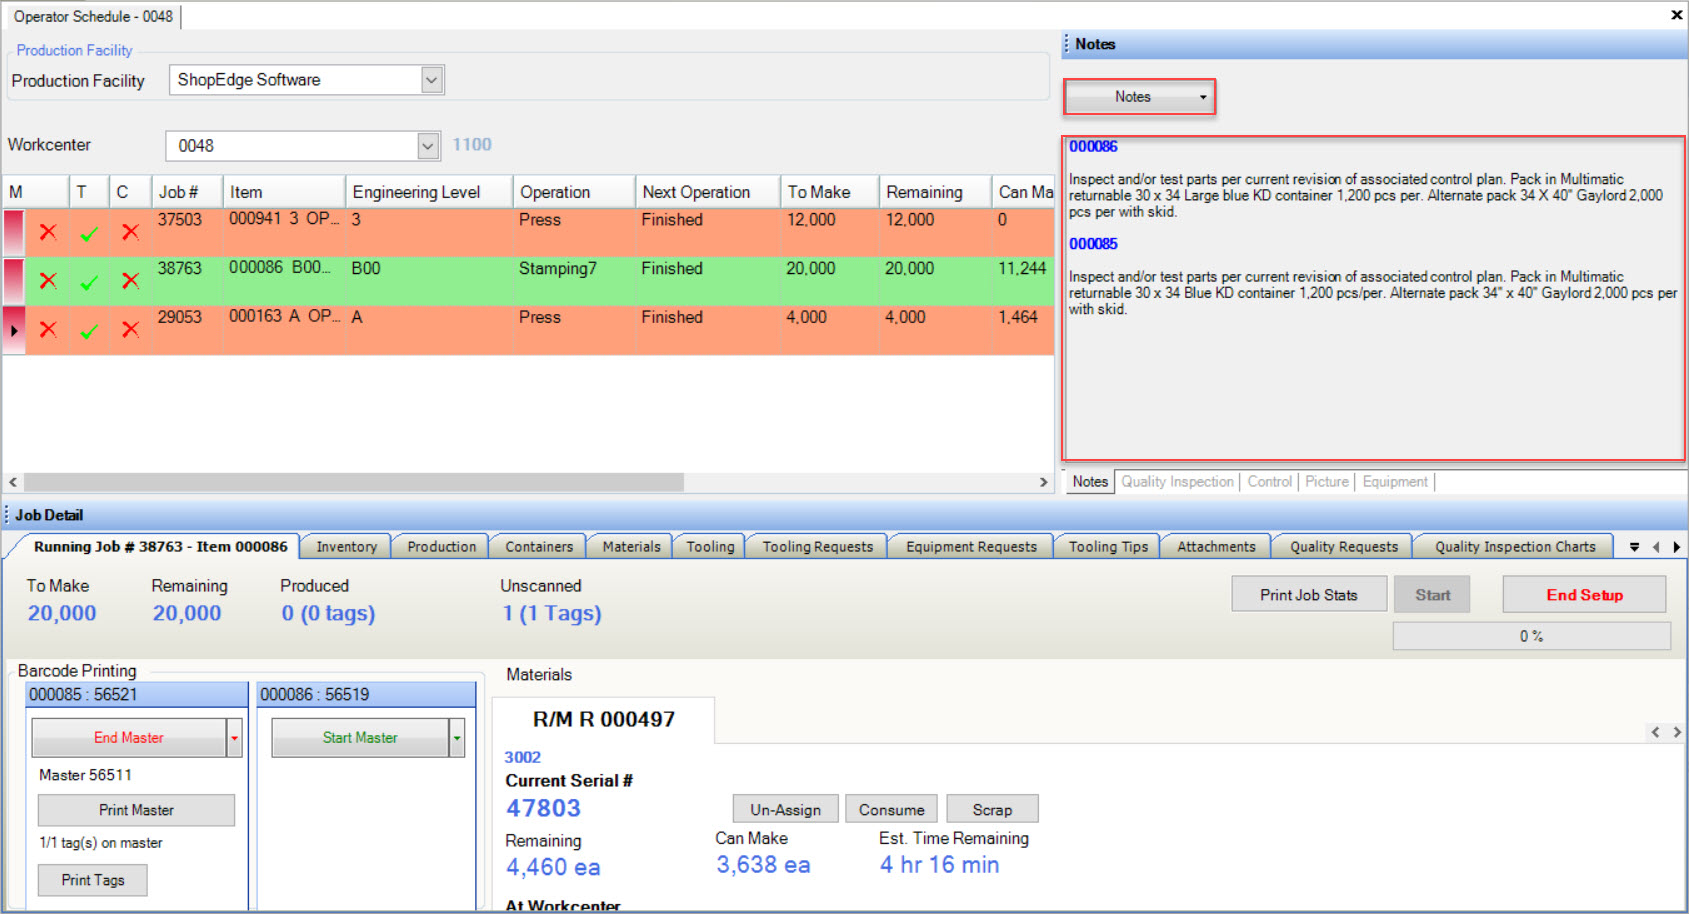
Any Notes on the Right Control Panel will be visible to the Operators of the Workcenter Schedule.
Quality Inspection
Quality Inspection can be viewed by clicking on the  tab located in the Right Control Panel of the Operator Schedule screen.
The Quality Inspection tab will display inspections which Operators must complete.
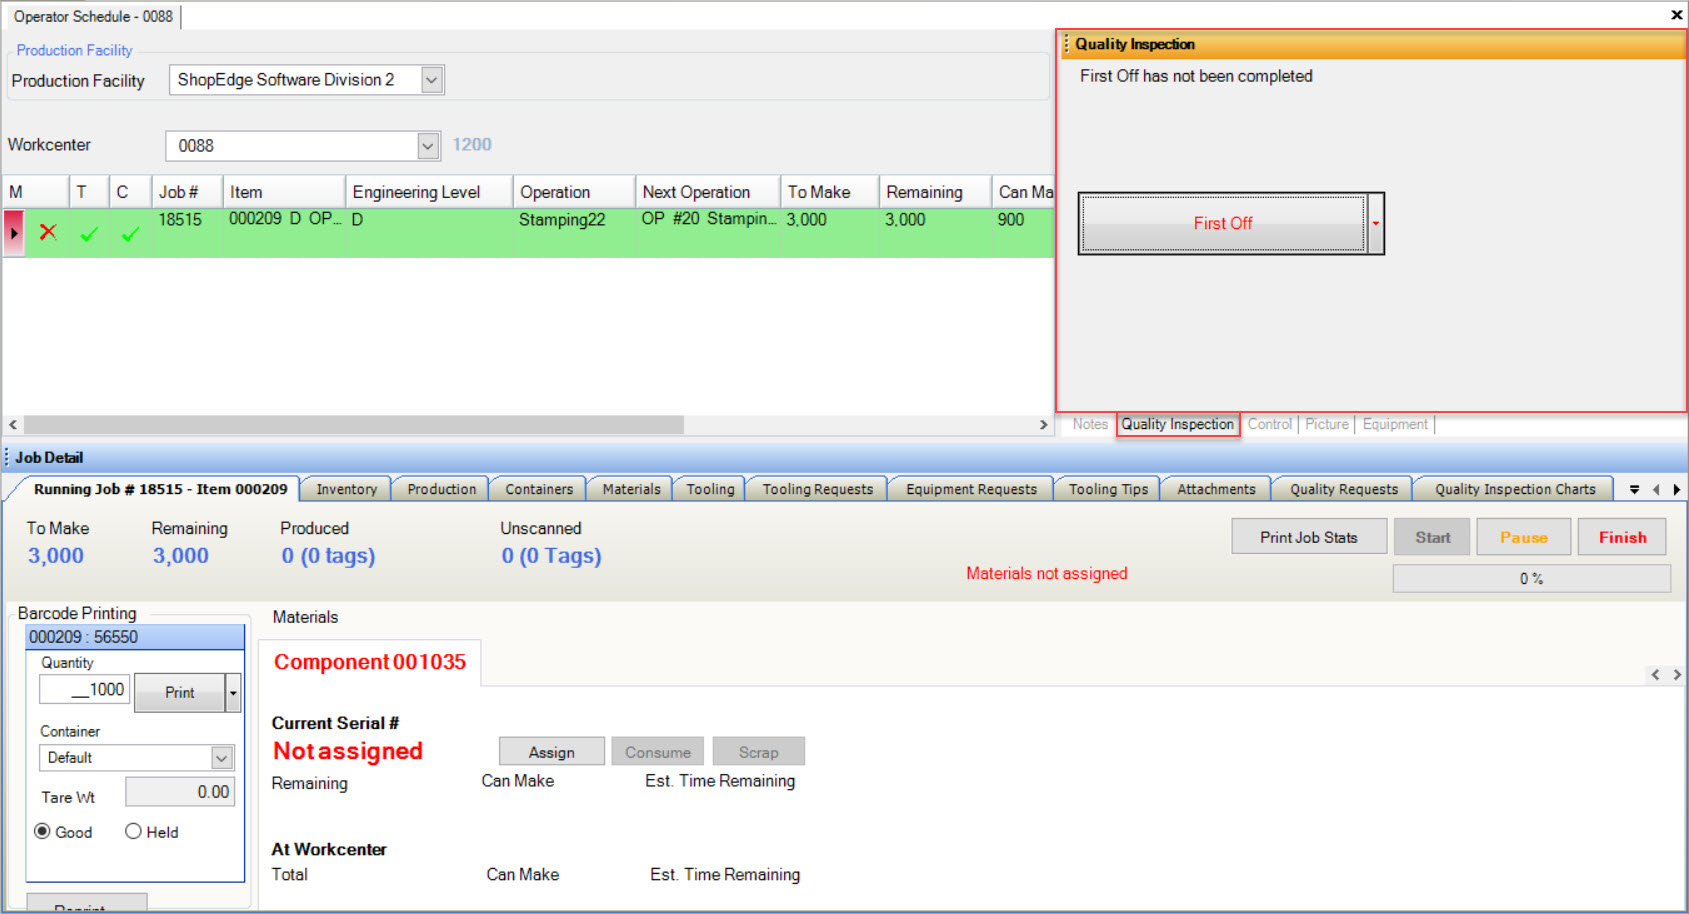
Completing a Quality Inspection
To complete a Quality Inspection, simply click on the  button. The Quality Inspection window will appear.
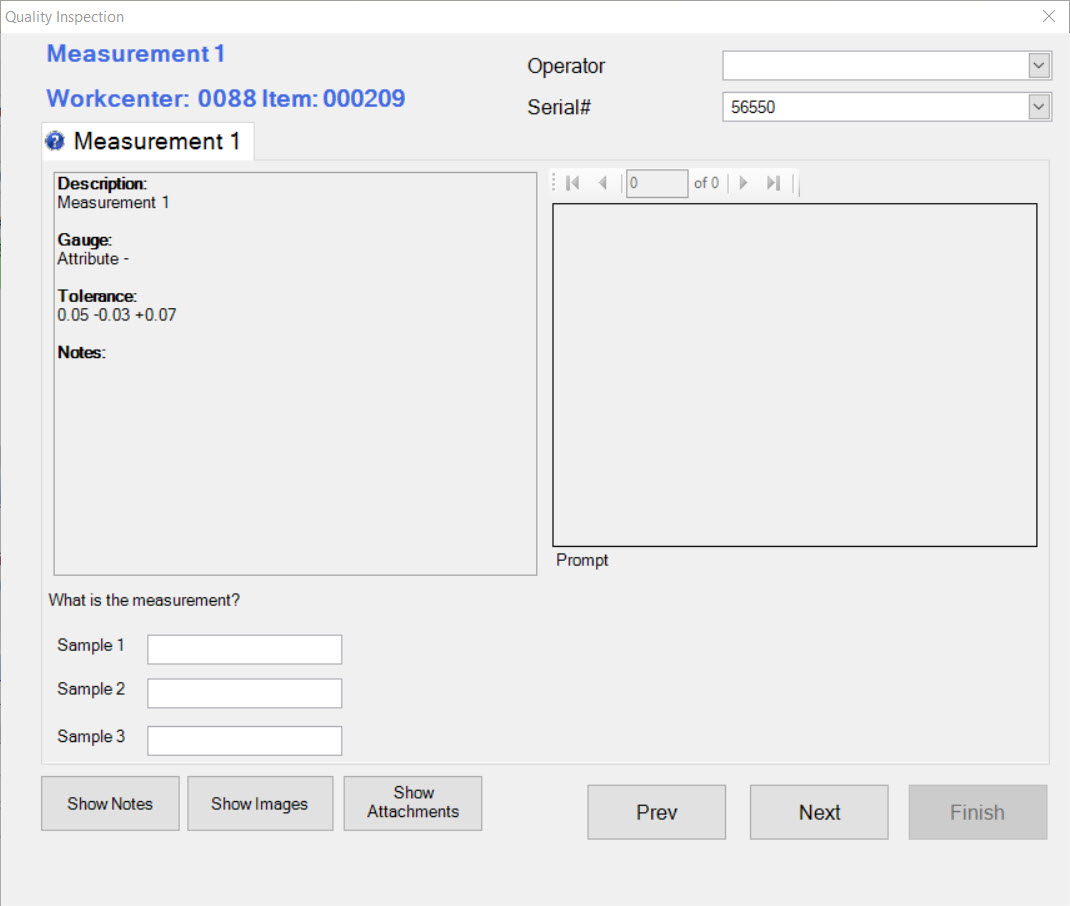
Users must enter in the measurements for each Sample in the appropriate textboxes. If you wish to view Notes, Images, or Attachments, simply click on the appropriate button. You may also view other
Quality Inspections by clicking on the  button and the
  button.
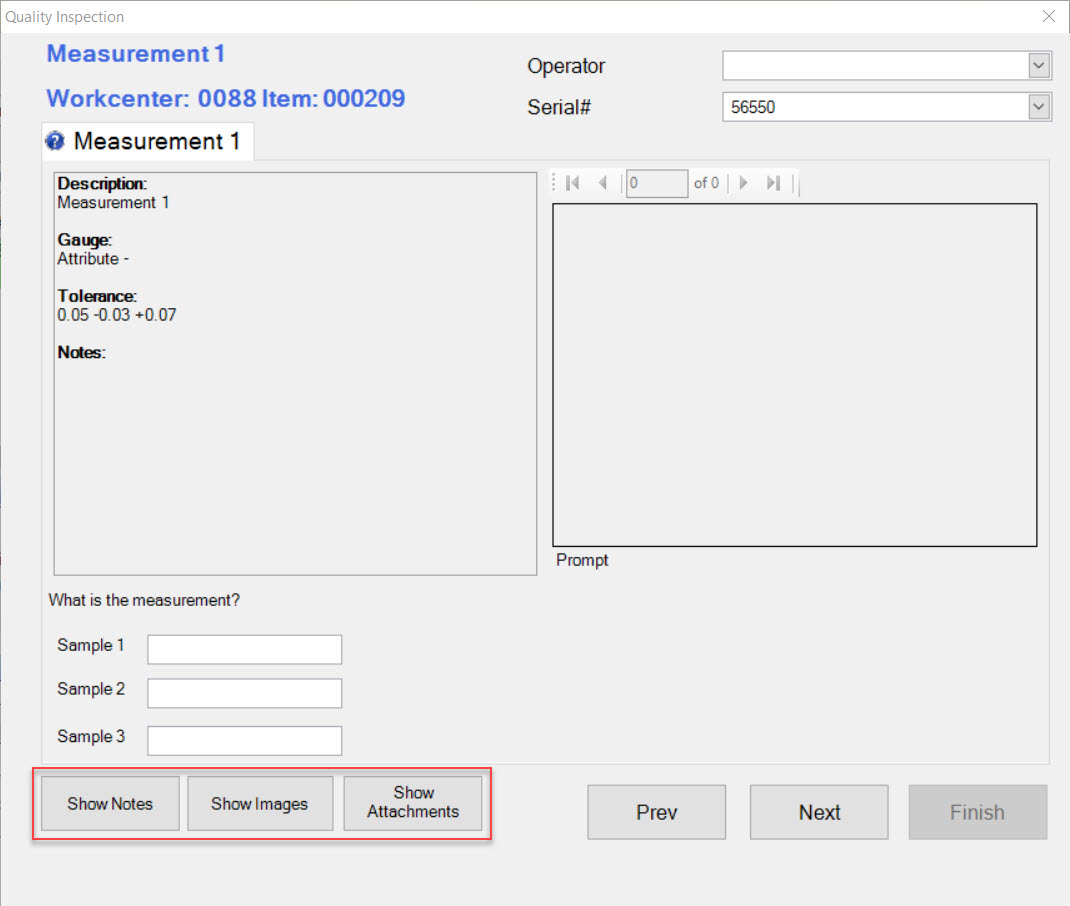
Once the measurements are entered in for each Sample, the  button will become available to complete the Quality Inspection(s).
Note
For more detailed information on Quality Inspections, please see the Quality Assurance module.
Out of Spec Measurement on a Quality Inspection
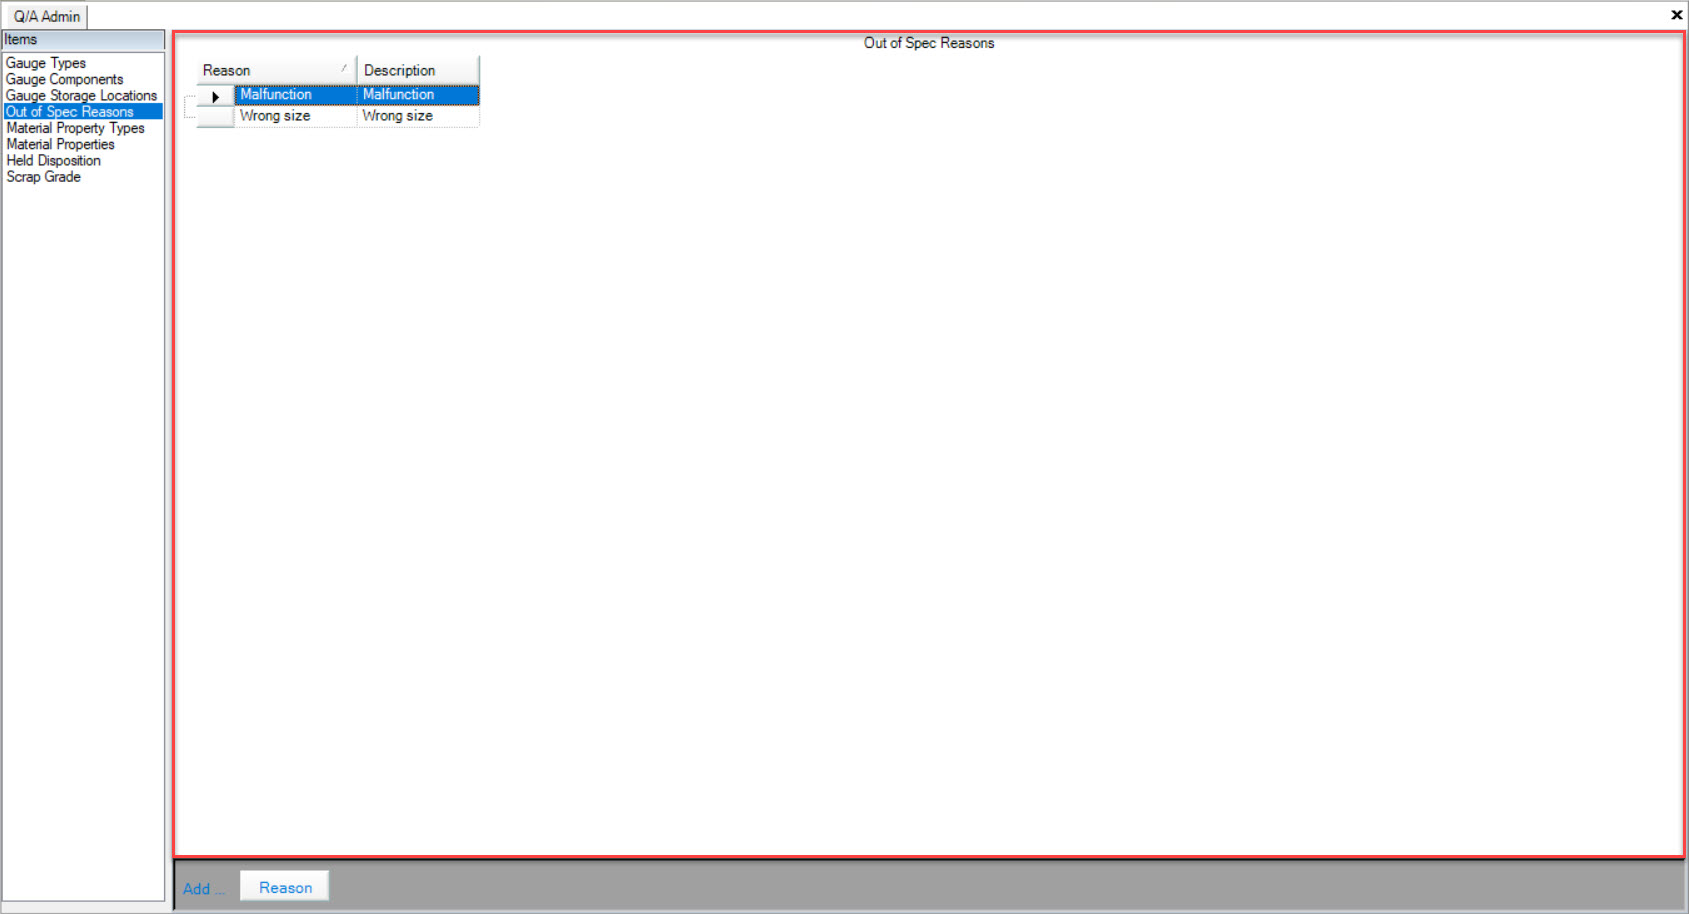
If a Quality Inspection is Out of Spec, users may be prompted by the system to select an Out of Spec reason, and then enter in any necessary Notes. Once that is completed, click on
the  button.
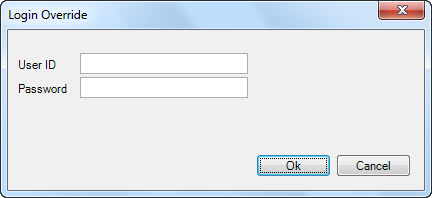
Users may also be prompted by the system before saving the Out of Spec reason to obtain an override by a Team Leader, Quality Personnel, or another qualified individual. Only this individual can authorize the override by entering in their User ID and Password.
Completing a First Off Quality Inspection
Once users start a Job at a Workcenter, and before the system will allow you to print any Barcode Tags, you must complete a First Off Quality Inspection if required.
To do so, simply click on the  button to open the Quality Inspection window.

An Operator must complete the Quality Inspections as well as enter in the appropriate Sample information before they will be allowed to click on the  button to complete the Quality Inspection.
Completing a Last Off Quality Inspection
Before finishing a Job at a Workcenter, users must complete a Last Off Quality Inspection if required.
To do so, simply click on the  button to open the Quality Inspection window.

An Operator must complete all of the Quality Inspections as well as enter in the appropriate Sample information before they will be allowed to click on the  button to complete the Quality Inspection.
Pausing the Quality Inspection Timer
If users need to pause the Quality Inspection timer, click on the  button. The timer will be paused, and indicated on the quality inspection tab.
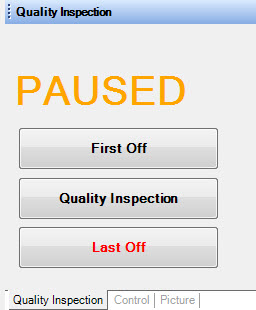
To un-pause the Quality Inspection timer, click on the  button and the timer will resume where it left off.
Control
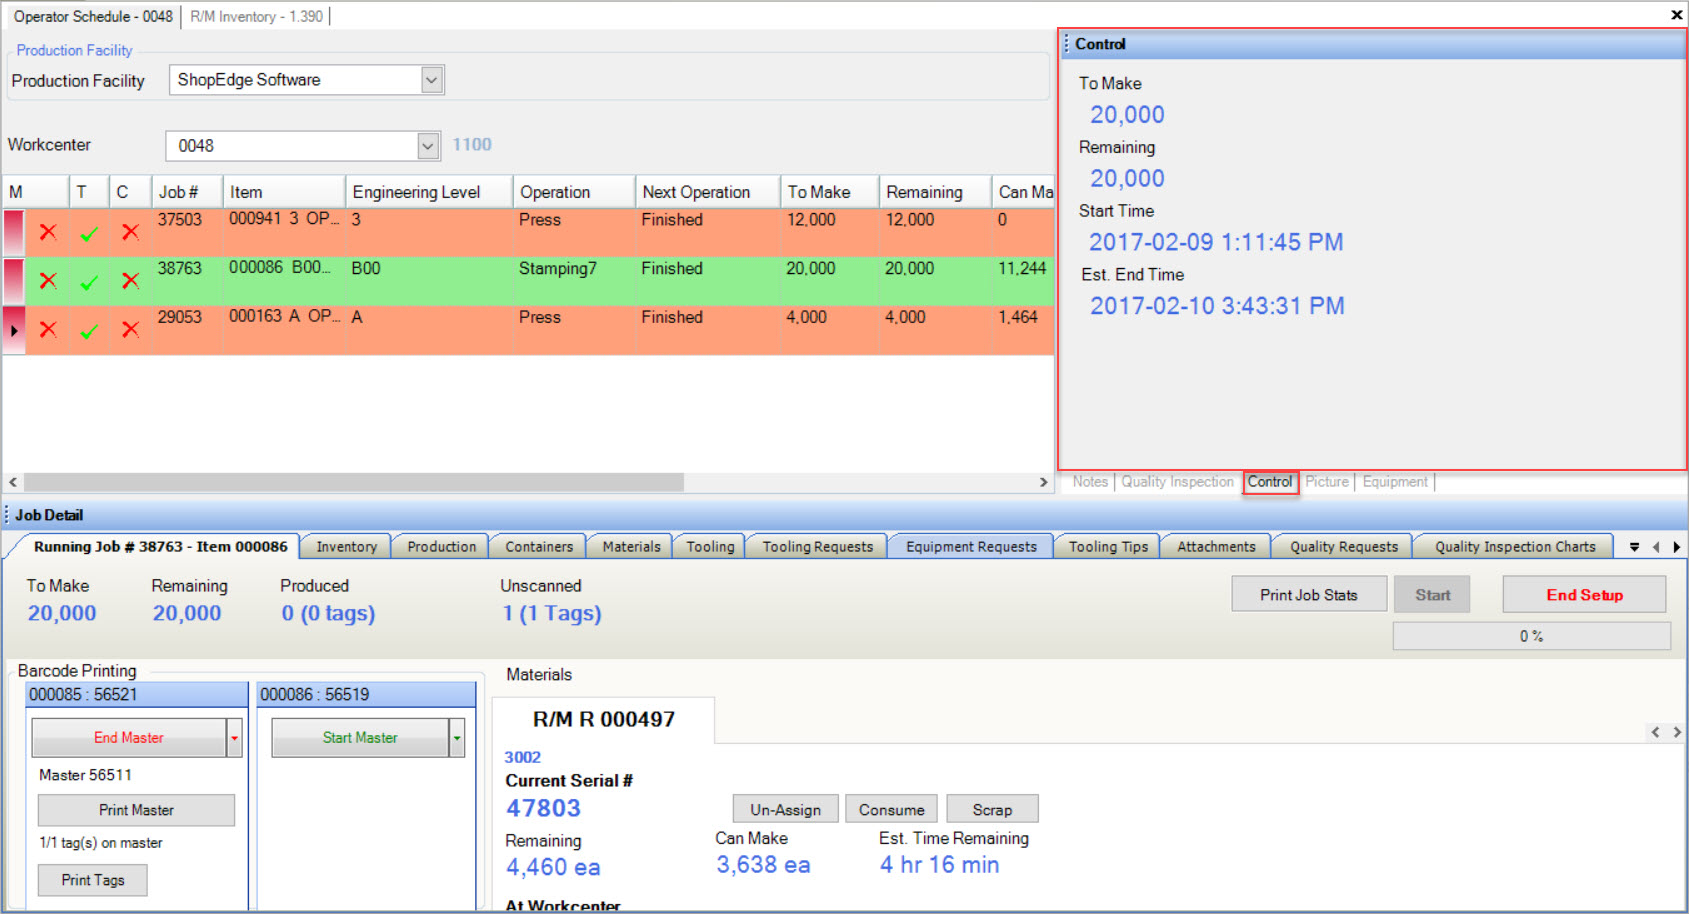
To view details regarding the current Job that is running such as the To Make amount, Remaining amount, Start Time, and Est. End Time, simply click on the  tab
located in the Right Control Panel of the Operator Schedule screen.
Picture
Clicking on the  tab will allow users to view Picture(s) and Picture Notes regarding the Workcenter Schedule on the Operator Schedule screen.
Note
The option to add or delete Pictures and Picture Notes is located on the Manufacture Routing screen. Open the routing you wish to add or delete Pictures and/or Picture Notes and make the necessary changes. Any Picture and/or Picture Notes can be viewed on both the Operator Schedule screen and the Workcenter Schedule screen.
Equipment
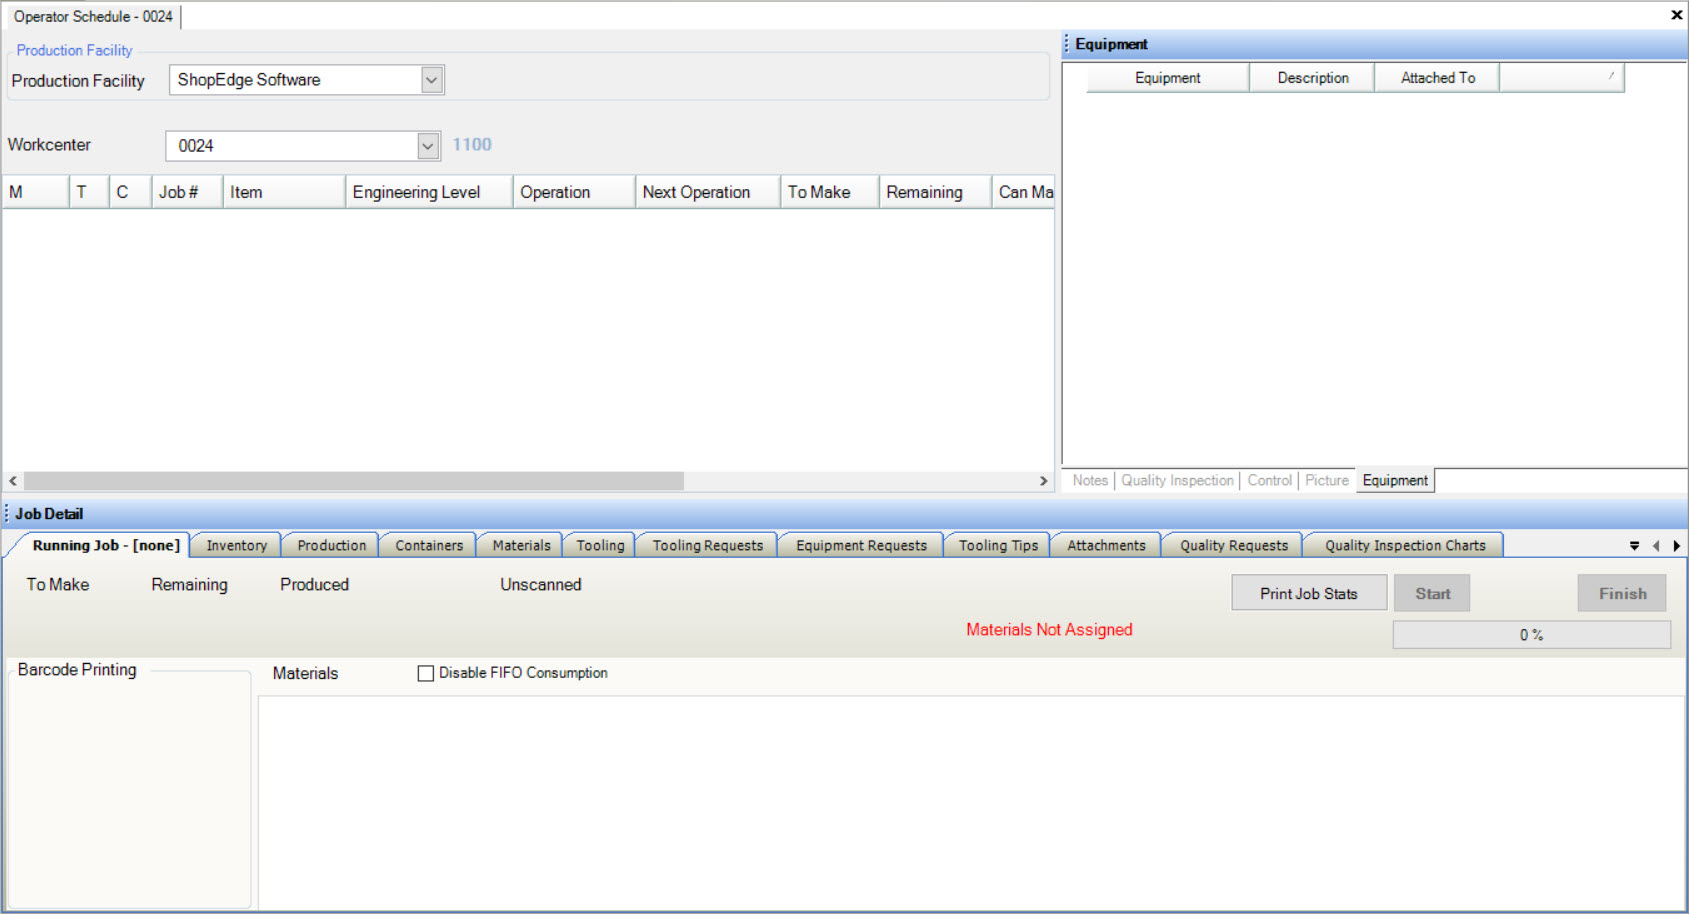
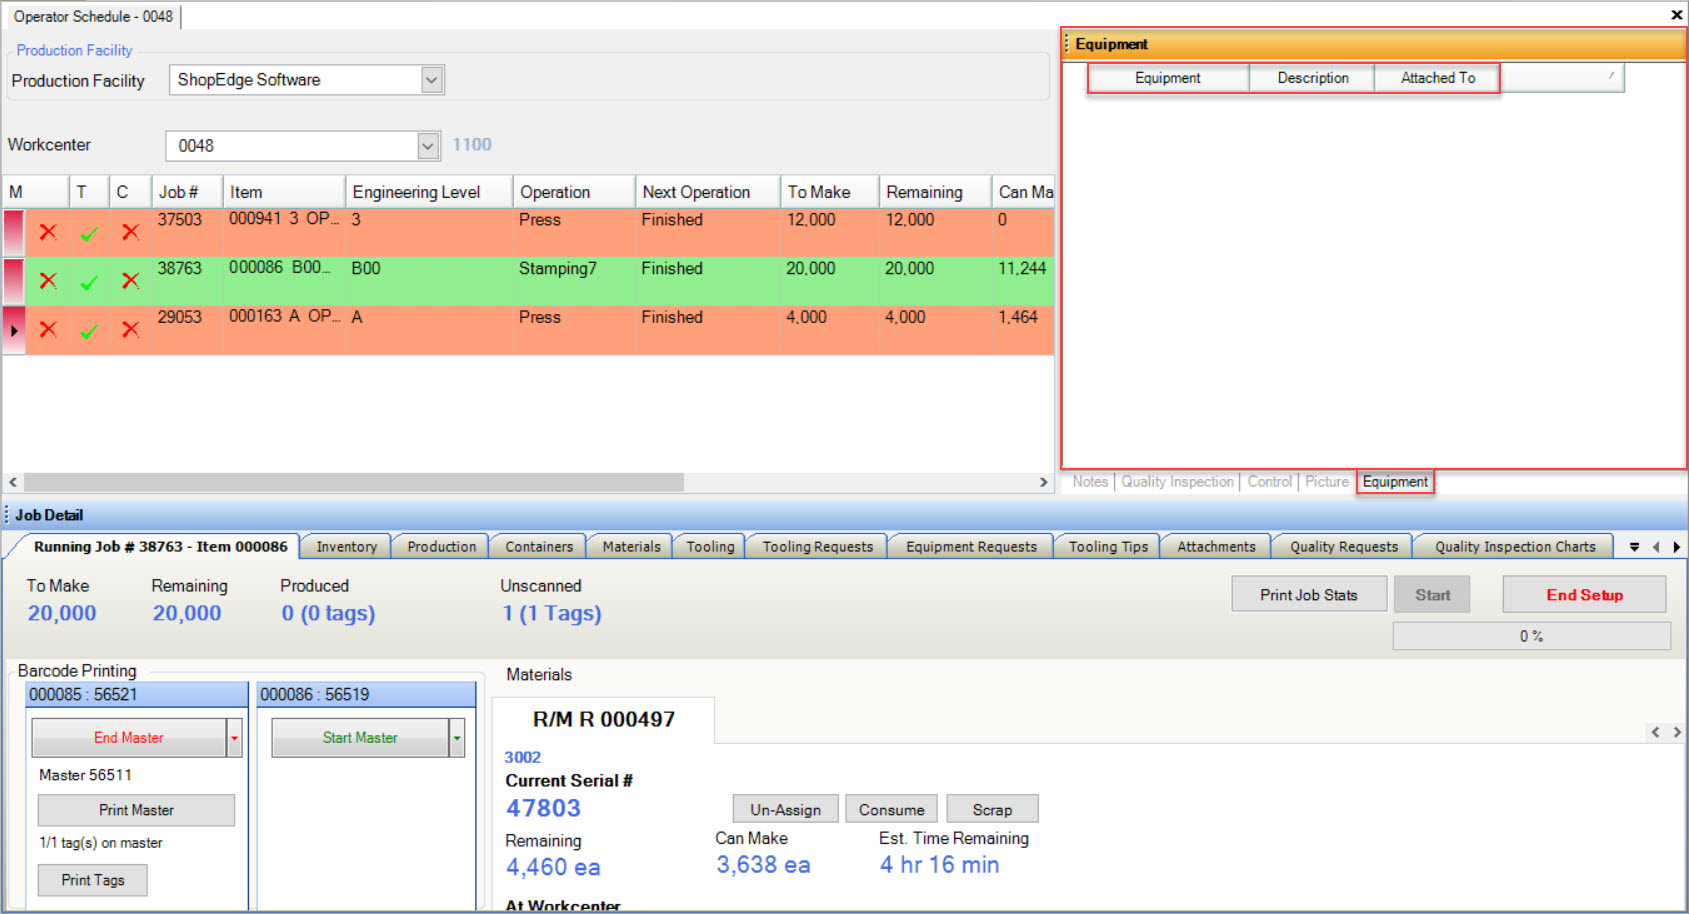
Equipment can be viewed by clicking on the  tab located in the Right Control Panel of the Operator Schedule screen.
The  tab allows users to view the Equipment, Description, and Attached To for the Job on the Workcenter Schedule located on the Operator Schedule.
Job Details
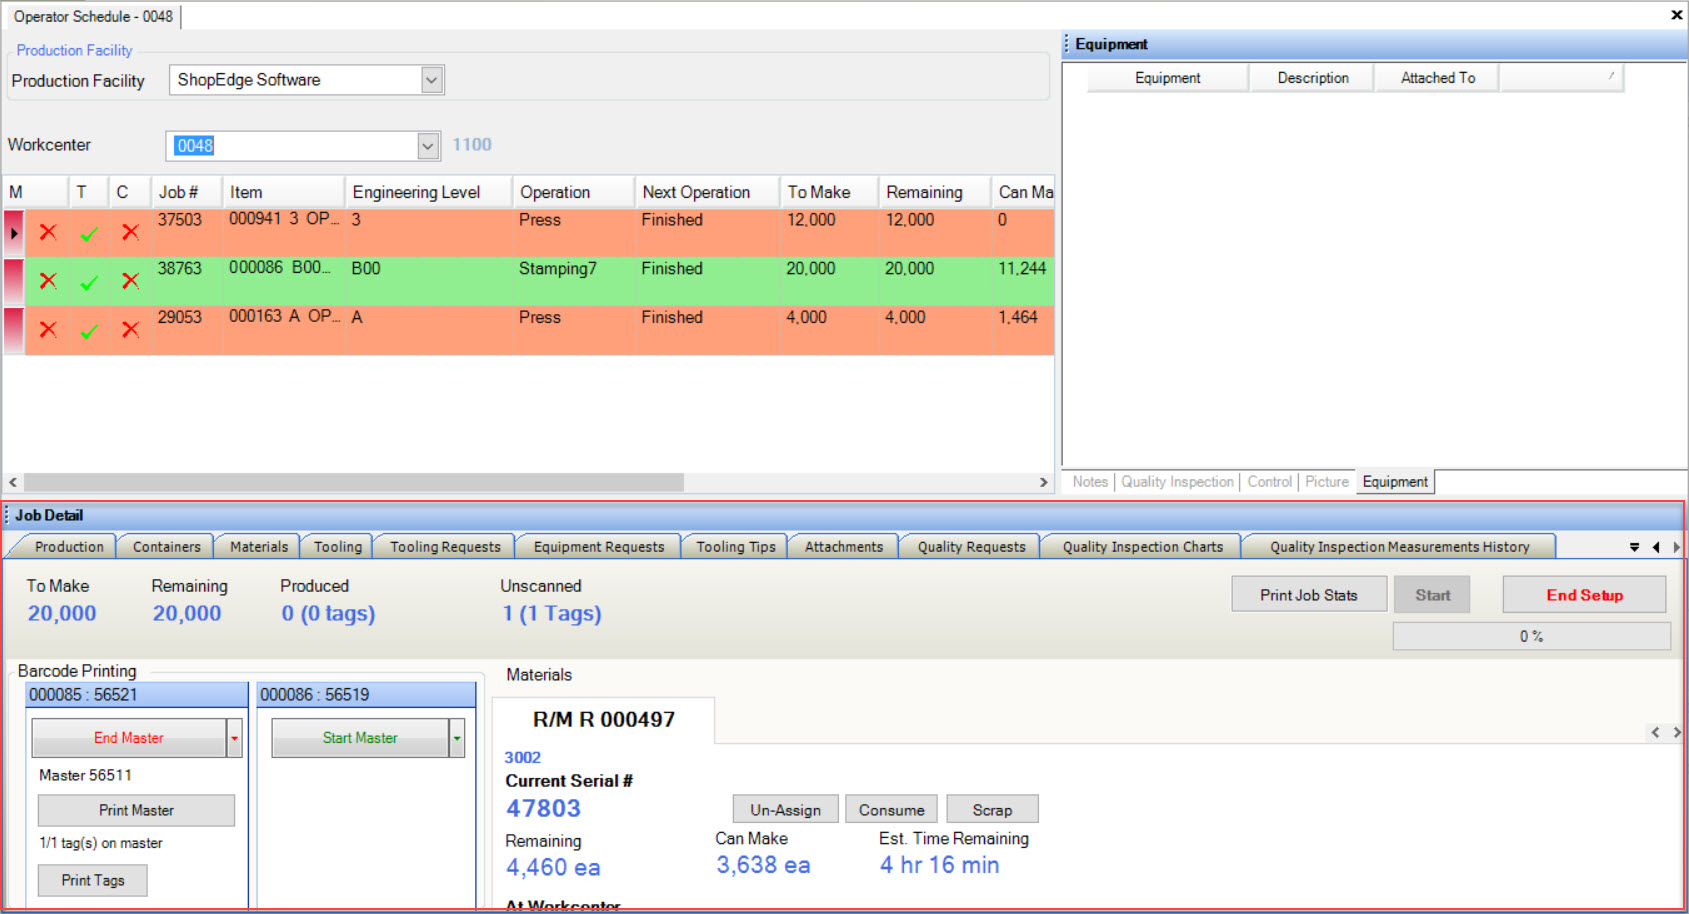
The Job Detail section of the Operator Schedule screen is located at the bottom of the screen. It includes details regarding the current running Job, Production, Containers, Materials, Tooling, Tooling and Equipment Requests, Tooling Tips, Attachments, Quality Requests, Quality Inspection Charts, and Quality Inspection Measurements History.
Running Job Tab
Running Job details can be viewed by selecting the  tab.
tab.
The information for each Item on the Manufacture Routing screen may be different therefore causing the Running Job details to appear different when selecting the various Workcenters on the Operator Schedule.
Printing Job Stats
On the Running Job tab, users have the ability to Print Job Stats.
To Print Job Stats, simply click on the  button.
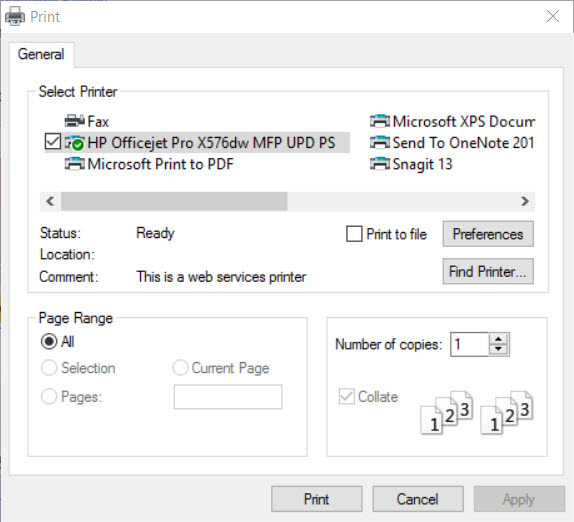
The Print window will appear where users can select the appropriate printer and print settings. Click the  button to print the Job Stats.
The Job Stats will be printed.
Starting a Job
On the Running Job tab, users have the ability to start a Job. Before Barcode Labels can be printed, or Tooling Requests created, a Job must be running in the Workcenter.
To start a Job while on the Running Job details tab, simply click on the  button.
Only one Job can be running at a time in a Workcenter. If a Job is already running, then the  button will be disabled. Once the Job is started, it will be
highlighted green in the schedule and the Status will change from Scheduled to Running.
The Job will now begin its Production process.
Note
Jobs can be started and re-started as many times if necessary.
Pausing a Job
On the Running Job tab, users have the ability to pause a Job.
To pause a Job, simply click on the  button.
The Job will be paused from the Production process.
When users are ready for the Job to resume, simply click on the  button.
The Job will resume where it left off in the Production process.
Ending Setup
On the Running Job tab, users may have the ability to end setup where applicable.
To end setup (if applicable), simply click on the  button.
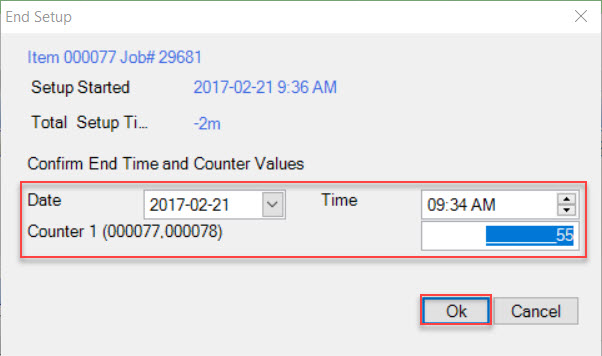
The End Setup window will appear, displaying the Setup Started date and time. Users will need to enter in a Date and Time for ending the setup as well as enter in an appropriate Counter value. Click
on the  button to complete the end setup.
Finishing a Job
On the Running Job tab, users have the ability to finish a Job.
To finish a Job, simply click on the  button.
The Job will finish its Production process.
Assigning and Un-assigning Inventory Tags
Before printing Barcode Labels from the Running Job tab on the Operator Schedule, users must make the system aware of the Serial Numbers of the Material(s) that is being consumed (WIP and Raw Materials). If there are multiple Materials that are required by a Job, there will be a tab for each one located on the Running Job tab.
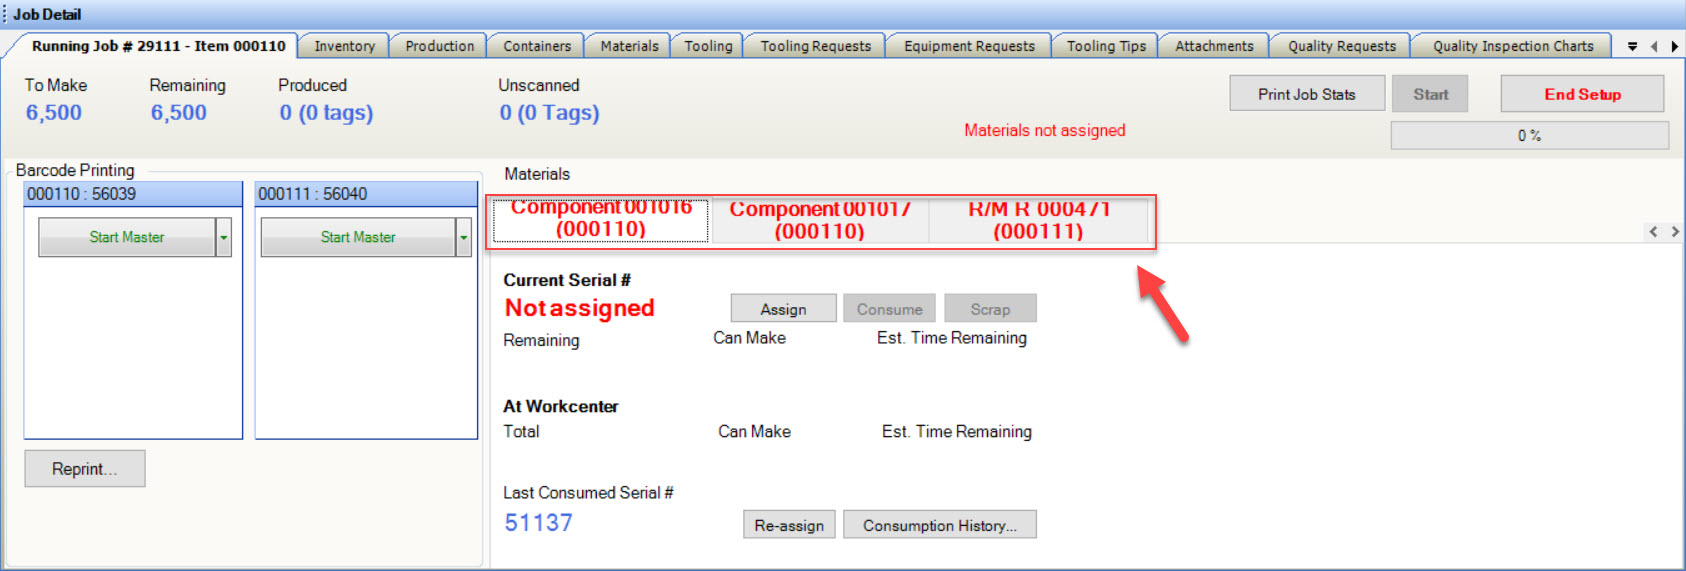
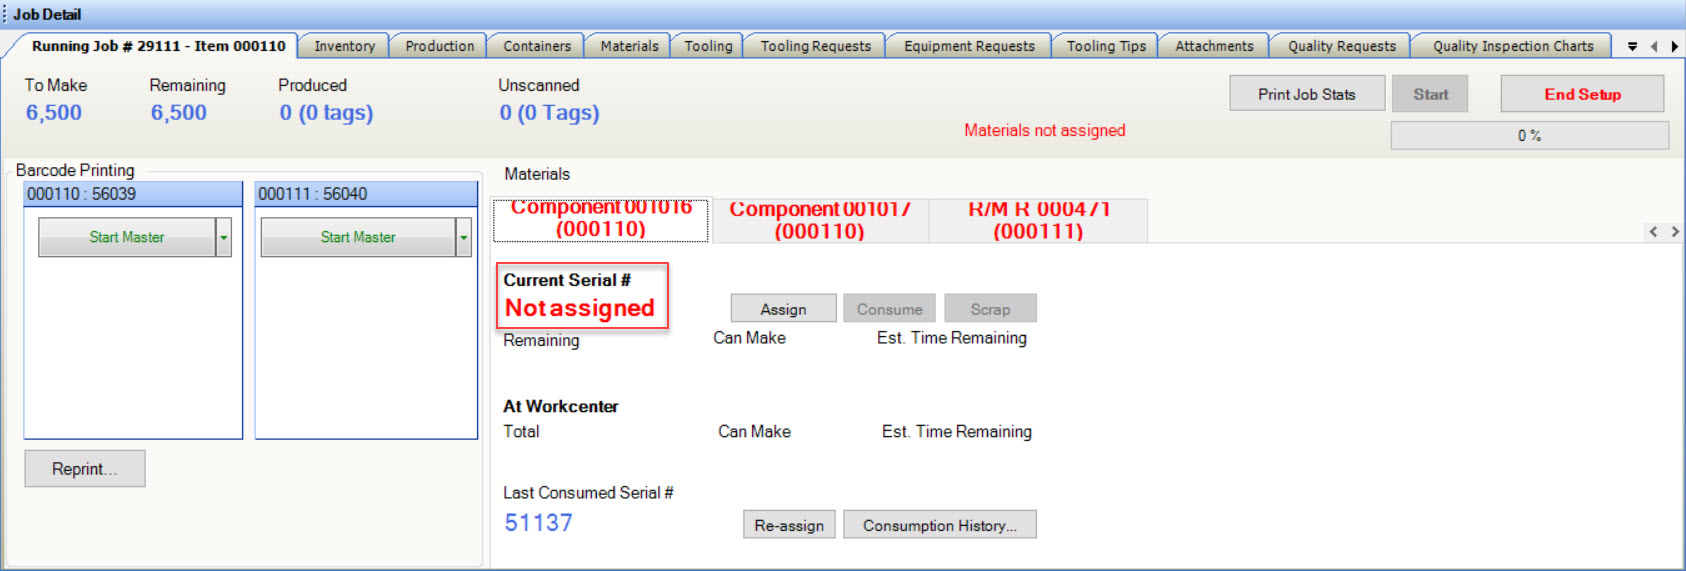
The tabs for the Materials will appear red until the Serial Numbers are assigned. The system will also display a note below the Current Serial # heading, that a Serial Number has not been assigned.
Note
WIP Materials are displayed by their Part and Operation Number, whereas Raw Materials are identified by their Part Number only.
To assign a Serial Number to the Material(s) being consumed, click on the  button. The Assign Material window will appear displaying a list of available
Serial Numbers.
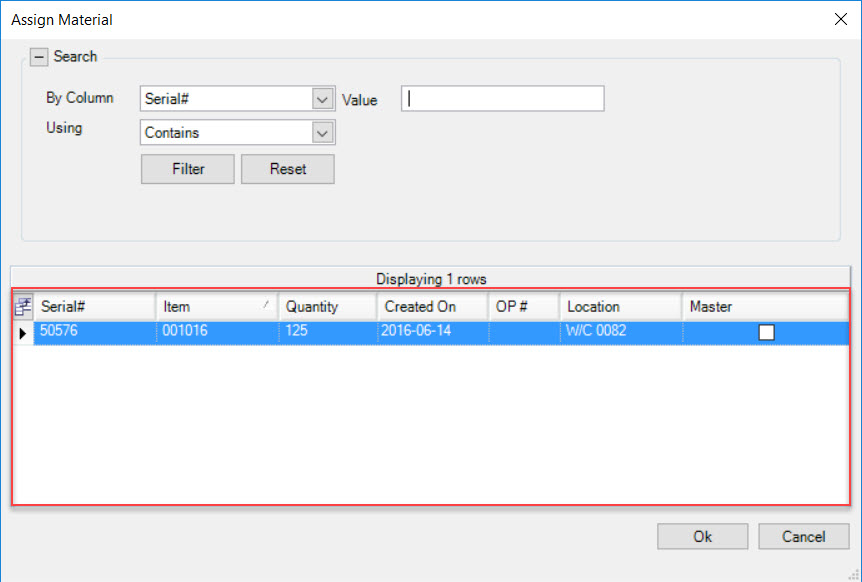
Select the Serial Number that you wish to use by highlighting the appropriate row and then click on the  button.
Once the Material is assigned the select Serial Number, the tab will change colour to black. Detailed information about the Serial Number will be displayed such as the Current Serial #, Remaining amount,
Can Make amount, and the Est. Time Remaining.

Note
Each Material tab must be assigned a Serial Number before Barcode Labels can be printed. Once each Material has an assigned Serial Number, the  message will disappear.
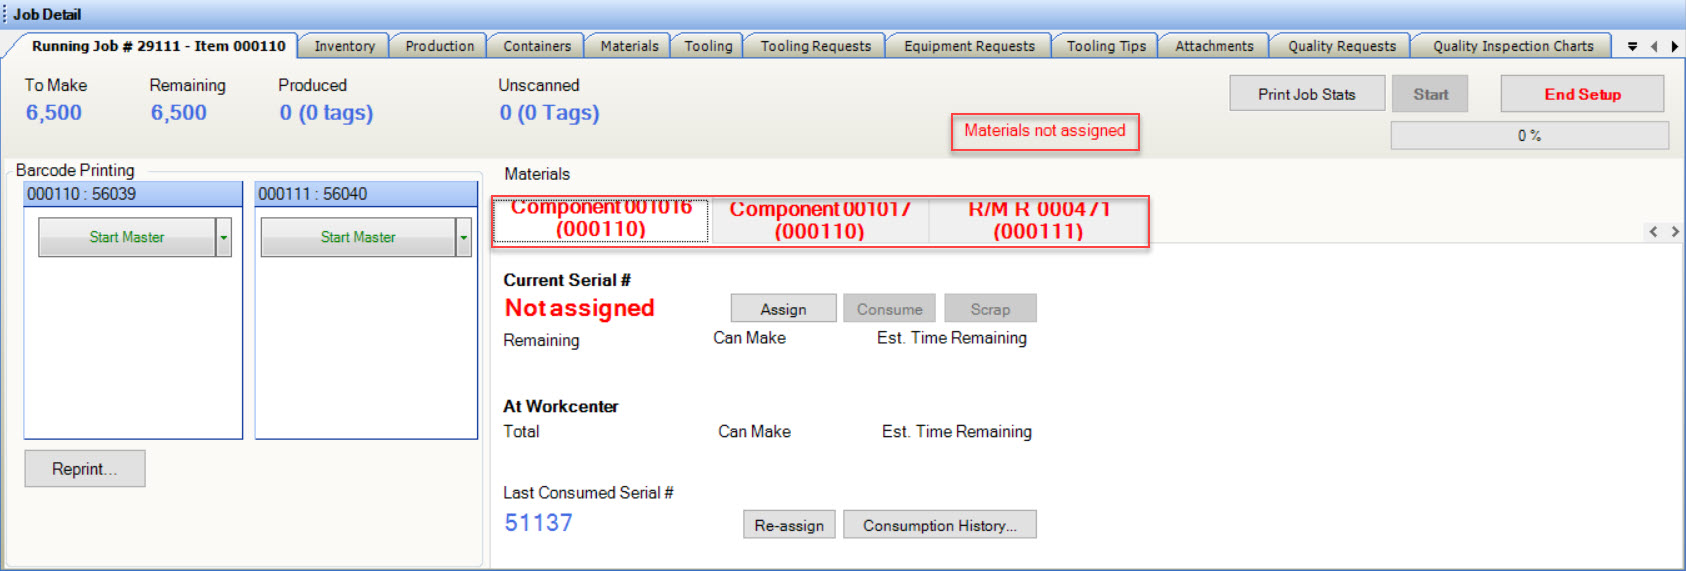
To un-assign a Serial Number from Material(s), simply click on the  button. The Un-Assign window will appear.
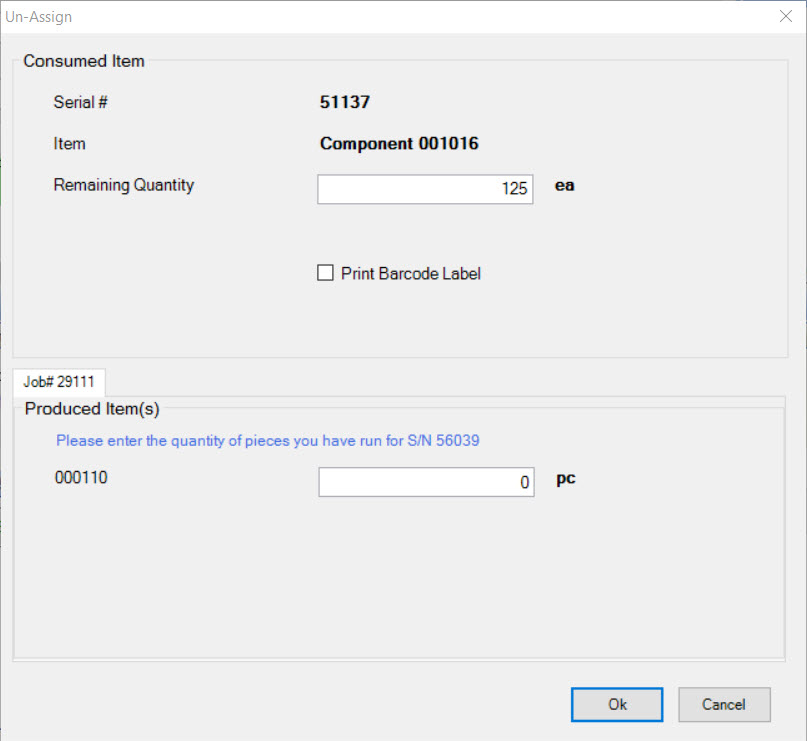
Verify that the information on the Un-Assign window is correct and click on the  button. The Serial Number will be un-assigned to the Material.
Consuming Inventory Tags
When Material is fully consumed (i.e. coil is gone, or bin is empty), it must be removed from the system and have a new Serial Number assigned to it.
To consume Material, click on the  button. The Consume window will appear. Verify the information and then click on the
 button.
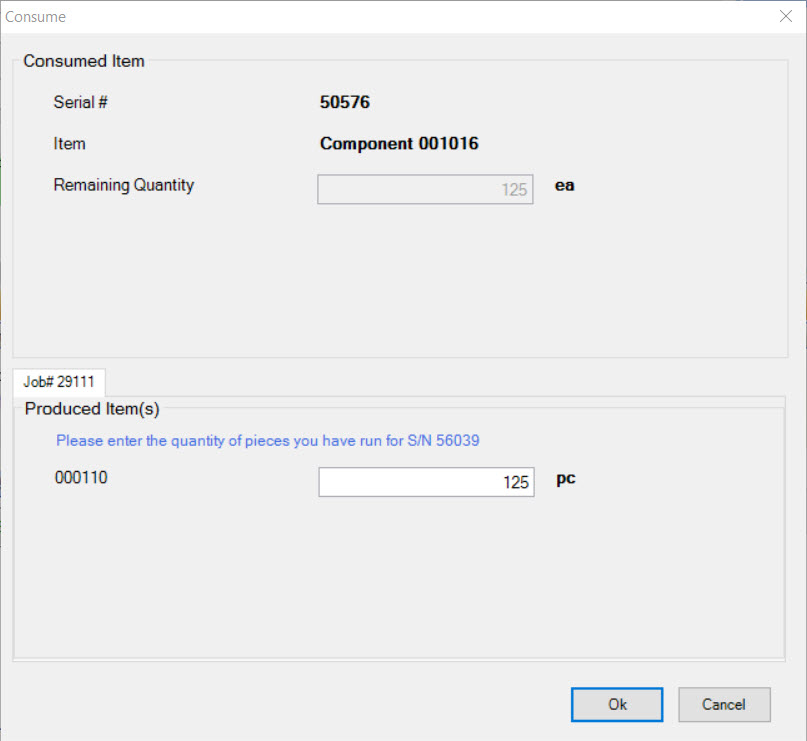
If you have a partial bin of parts, enter the Quantity of Parts in the bin so far. The remaining parts will be consumed out of the next Raw Material that you assign. ShopEdge will default the Quantity based on the number of pieces that should have been produced from the remaining Quantity based on the Bill of Material.
As you consume Raw Material to complete a bin, the system keeps track of the Serial Numbers consumed so far, and the Quantity produced from each.
Once consumed, the Serial Number will be removed from Inventory in the system.
In the event that a Serial Number must be moved back to Inventory (due to Quality reasons, etc.), click on the  button.
A Re-assign confirmation window will appear. Verify that the re-assigning Serial Number is correct and click on the  button.
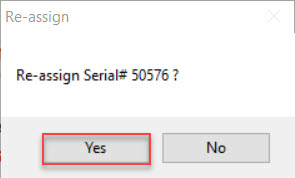
The Serial Number will be re-assigned back to the Material.
Note
When Material has been un-assigned, or consumed, a new Serial Number must be assigned before Barcode Labels can be printed.
Changing a Produced Quantity
To change a Produced Quantity in the system, simply click on the  button. The Adjust Partial Produced Qty window will appear.
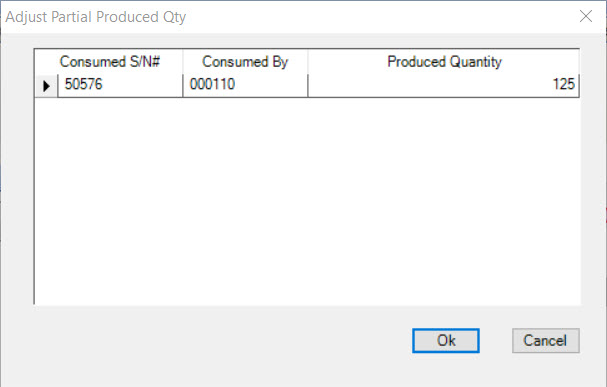
Simply enter in a new Produced Quantity by typing in the available textbox. Users can also enter a Produced Quantity of zero to remove the Tag.
Once the appropriate Produced Quantity is entered, click on the  button and the Quantity will be changed.
Scrapping Inventory Tags
Users have the ability to scrap Material once there has been a Serial Number assigned to it.
To scrap Material, simply click on the  button. The Scrap Material window will appear.
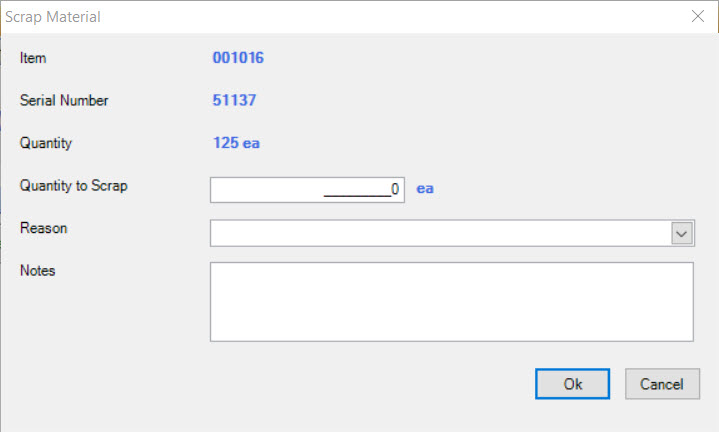
Enter in the Quantity to Scrap, select a Reason, and enter in any necessary Scrap Notes. Once the necessary fields are completed, click on the  button.
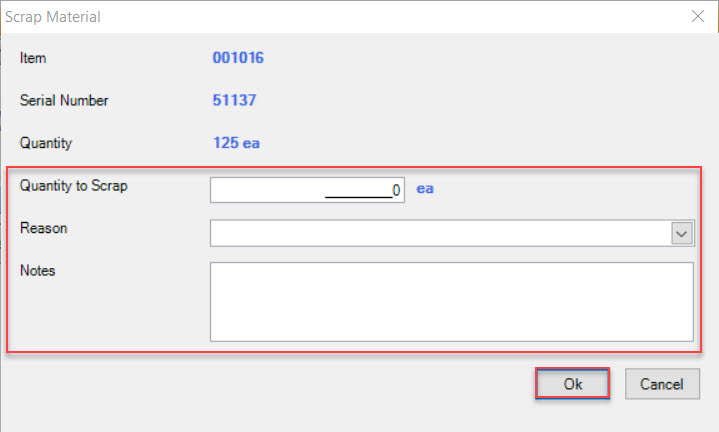
The selected Quantity to Scrap will be scrapped.
Consumption History
Users have the ability to view the History of Consumption for each Material of a Job on the Running Job tab.
To view the Consumption History, simply click on the  button. The Consumption History window will appear.
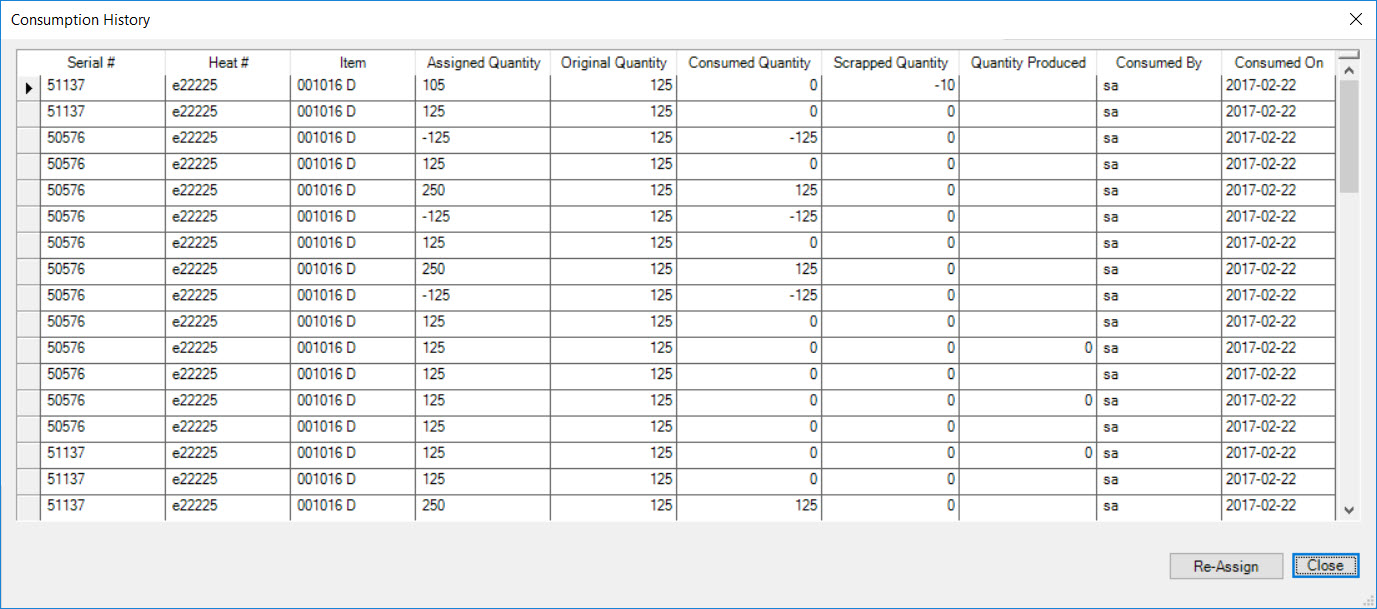
Users will be able to view all the Serial Numbers along with their Heat #, Item, Assigned Quantity, Original Quantity, Consumed Quantity, Scrapped Quantity, who it was Consumed By, and the Consumed On date.
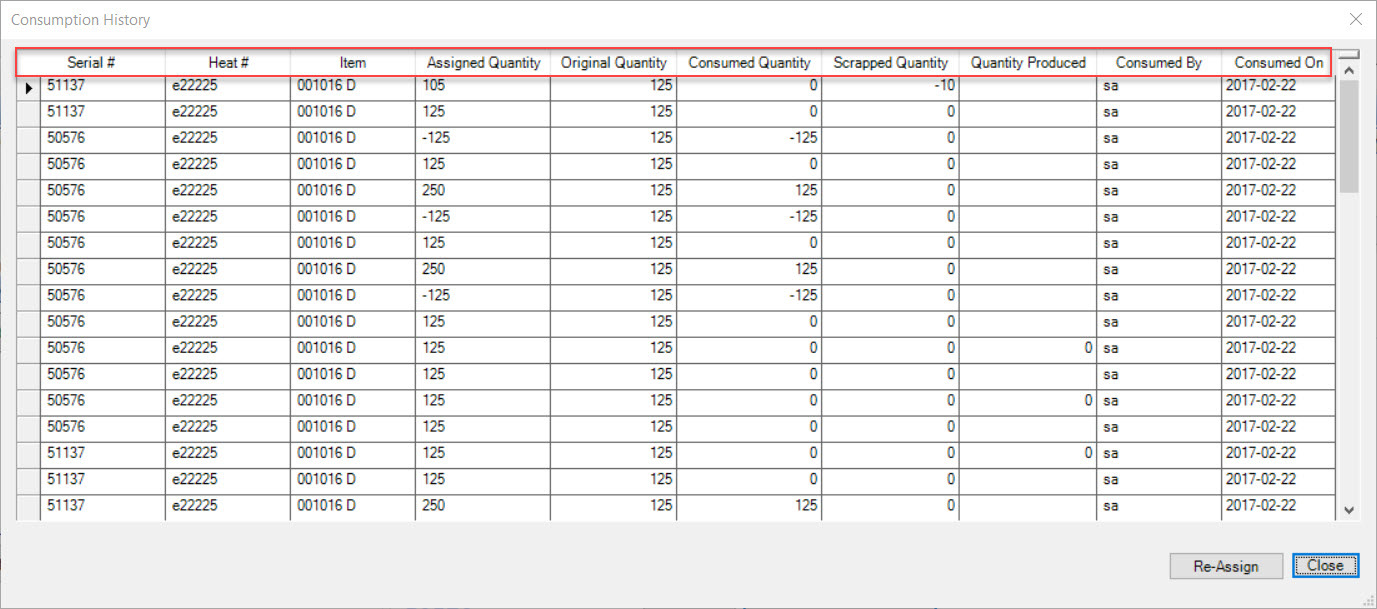
Here, users can also re-assign Serial Numbers if necessary. To do so, highlight the appropriate Serial Number and click on the  button and then click on the
 button. The Re-assign confirmation window will appear to ensure that the correct Serial Number is to be re-assigned. Click on the
  button to confirm.
The selected Serial Number will be re-assigned to the Material.
Printing Barcode Labels
On the Running Job tab, users have the ability to print Barcodes attached to specific Jobs on the Operator Schedule.
The information for each Item on the Manufacture Routing screen may be different therefore the available Barcodes to be printed may appear different on the Operator Schedule.
One Barcode Label
If there is only one Barcode Label to be printed, that means that there is only one Item being produced. In this case, the Running Job Barcode Printing tab details would look like this:
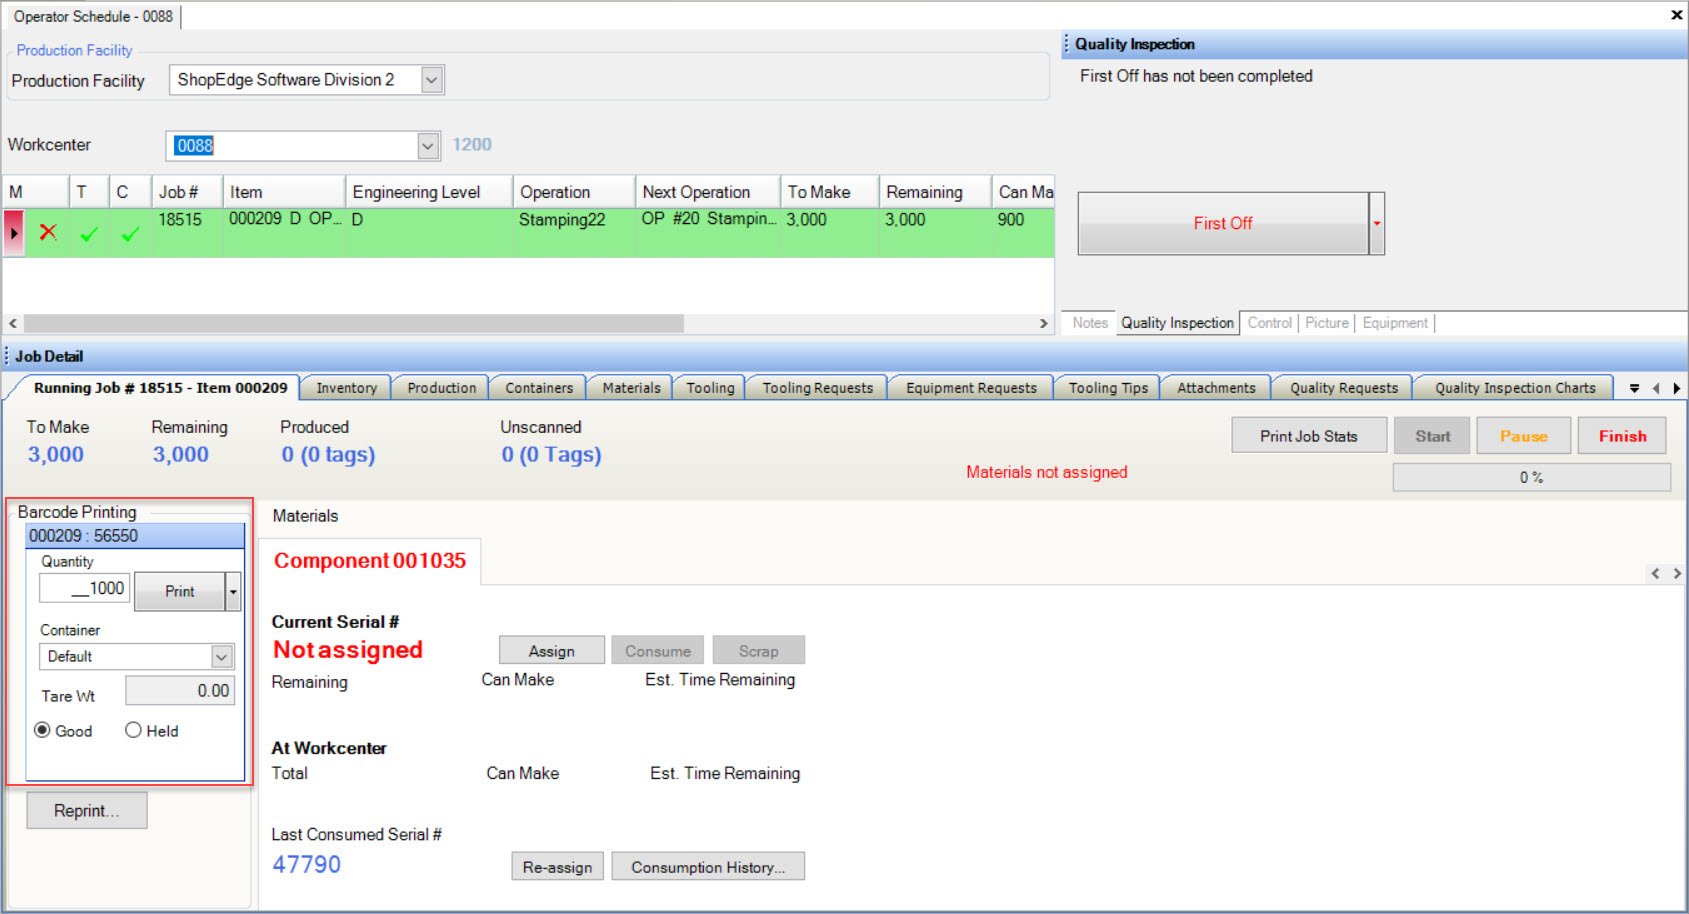
To print this type of Barcode Label, simply enter in the Quantity amount, select the Container, enter in a Tare Weight, and select Good or Held. Then, click on the  button.
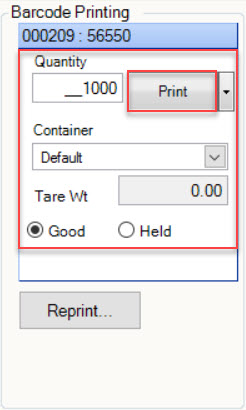
The Barcode Label will be printed.
Note
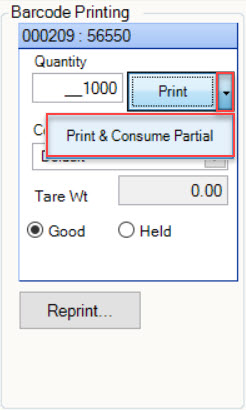
To print and consume partial Barcode Labels, simply click on the drop-down arrow beside the  button and select Print & Consume Partial. The Partial Tags window will appear. Select the Partial Tags and click on the
  button.
One Barcode Label with a Master Enabled
If there is only one Barcode Label to be printed but contains a  button, it means a Master Label is enabled on the Manufacture Routing. The Running
Job Barcode Printing details tab would look like this:
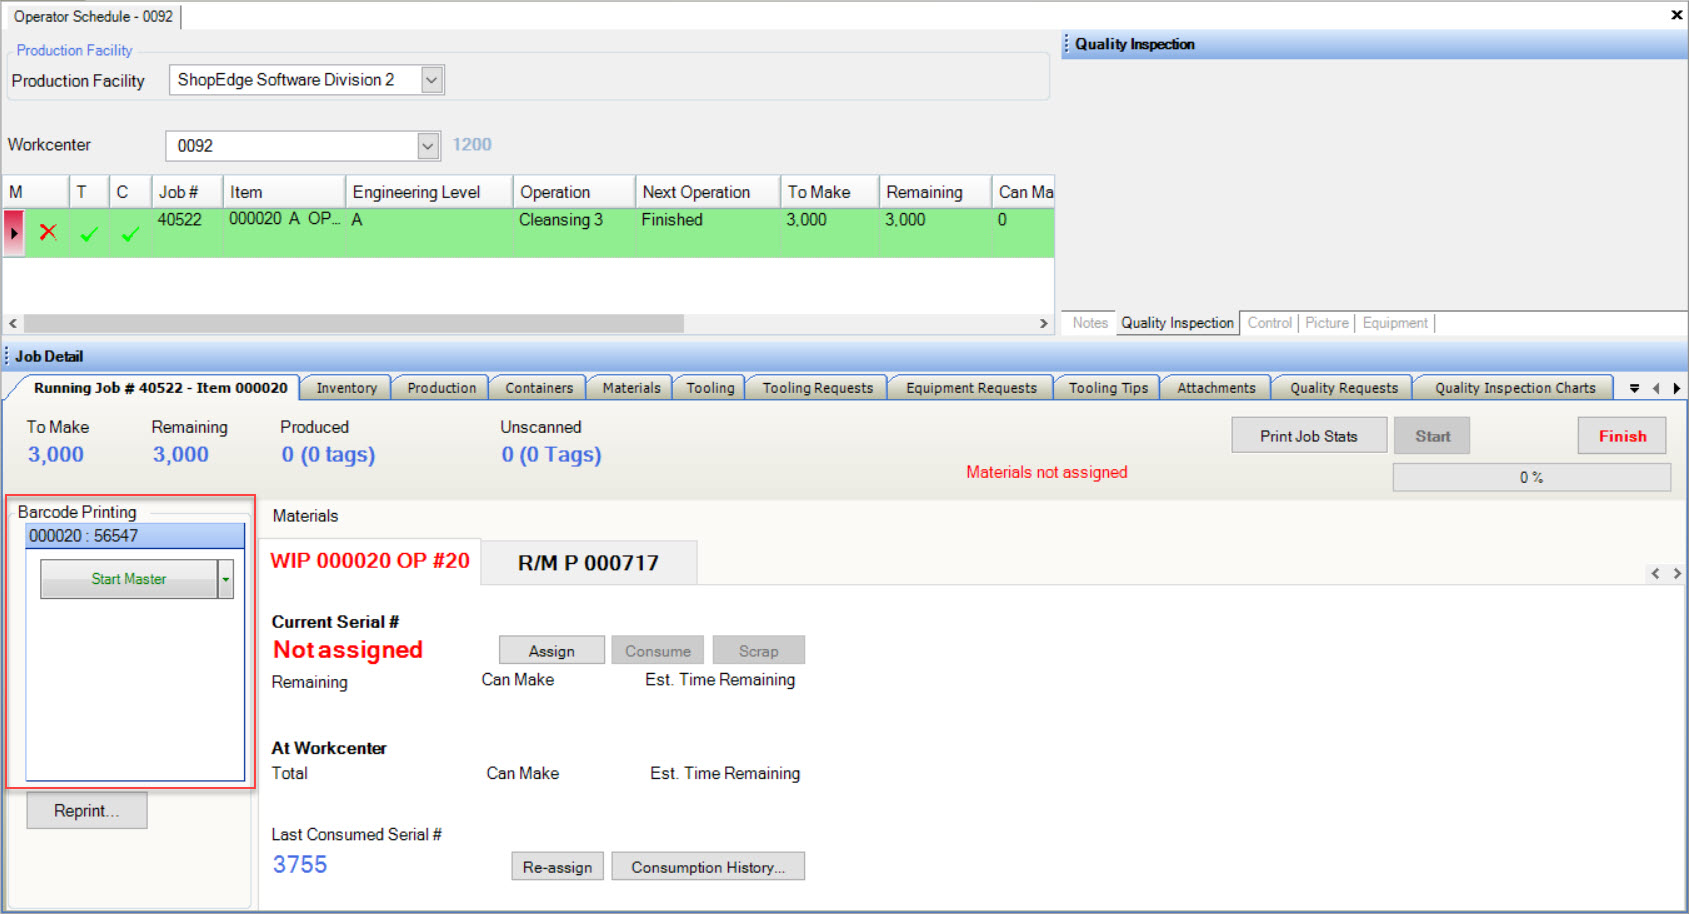
To print this type of Barcode Label, simply click on the  button. The Barcode Printing box will change.
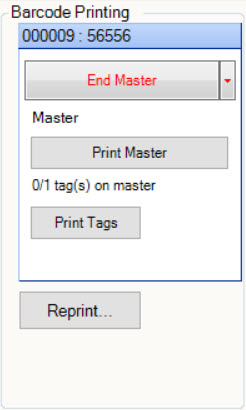
To print the Master Barcode, click on the  button. The Master will be printed.
To print the Tags, click on the  button. The Print Barcode Labels window will appear.
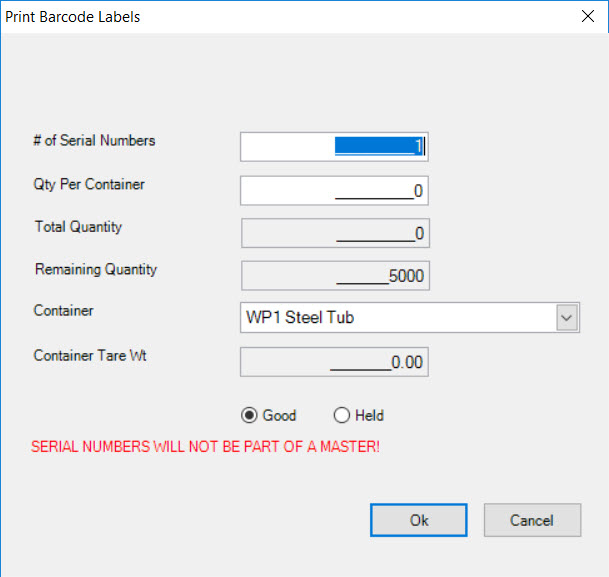
Enter in the appropriate information such as the # of Serial Numbers, Qty Per Container, and select the Container and Good/Held. Click on the  button.
The Tags will be printed.
Users also have the ability to end the Master by clicking on the  button. The End Master window will appear.
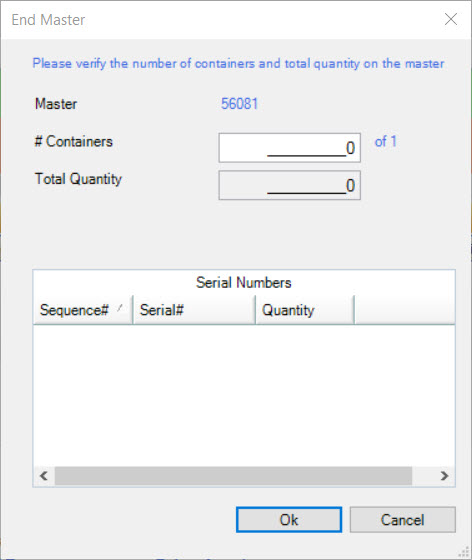
Verify the number of Containers and Total Quantity of the Master Label. Click on the  button once the necessary fields are verified.
The Master Label will end.
Note
Users have the ability to edit the Master by clicking on the drop-down arrow beside the  button. The End Master window will appear where users can edit and/or verify Containers and the Total Quantity. Click on the
  button when you are finished.
Two Barcode Labels
If there are two Barcode Labels to be printed, the Job currently running is actually two linked Jobs which is indicated on the Manufacture Routing screen. The Running Job Barcode Printing details tab would look like this:
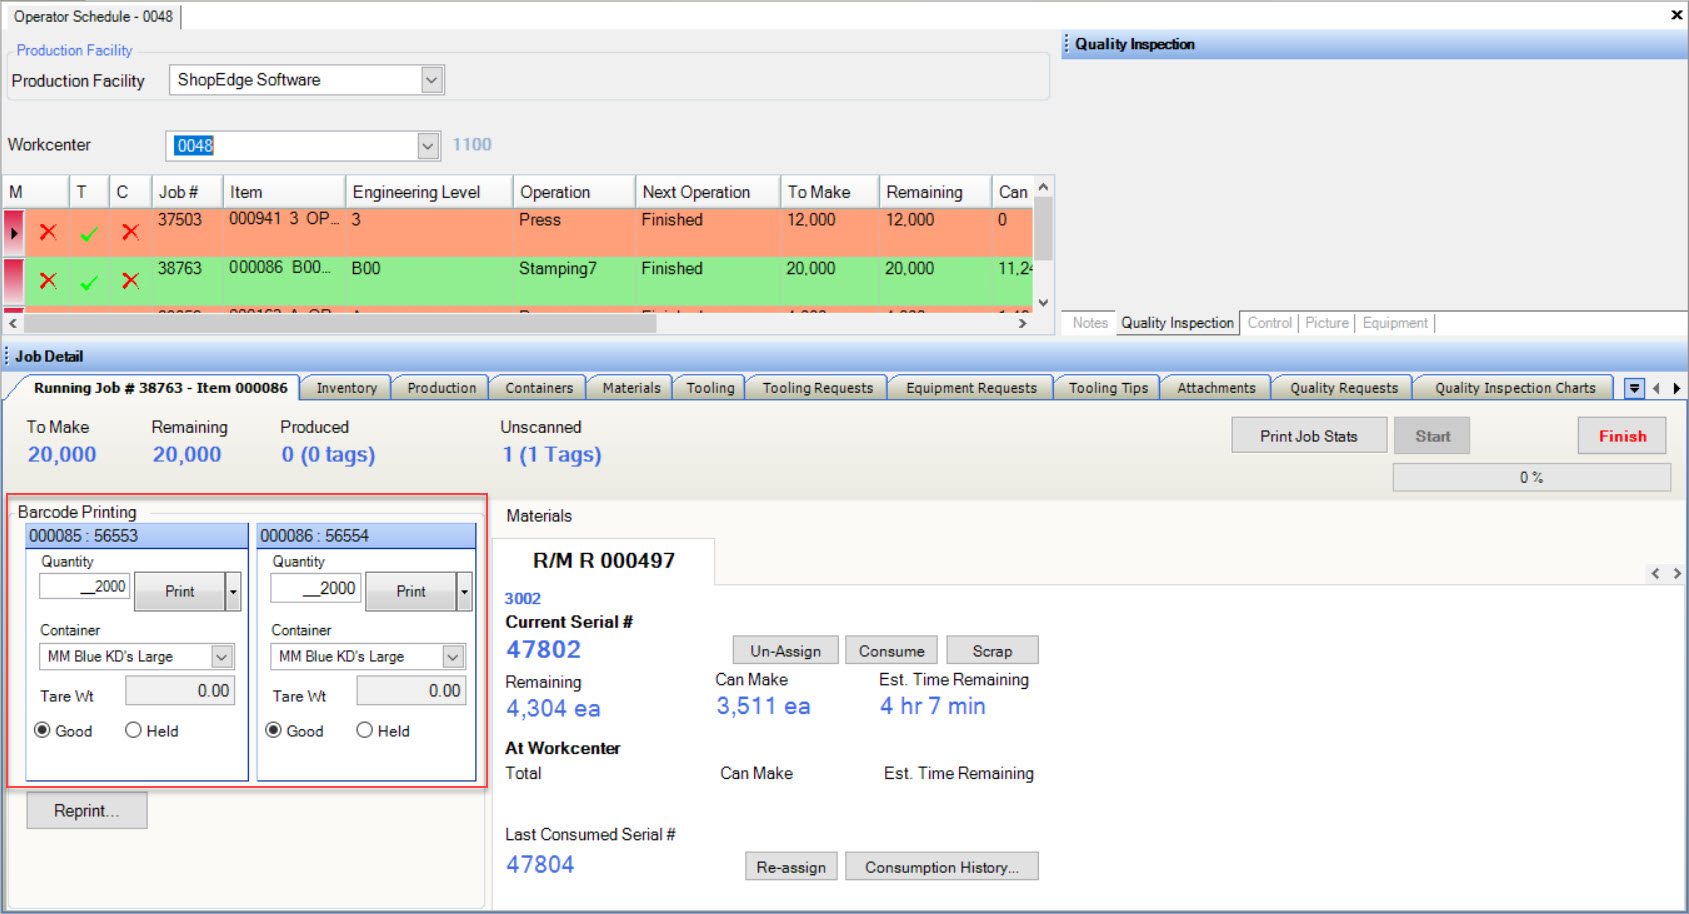
To print this type of Barcode Label, simply enter in the Quantity amount, select the Container, enter in a Tare Weight, and select Good or Held for both Barcodes. Then, click on the
 button for each Barcode.
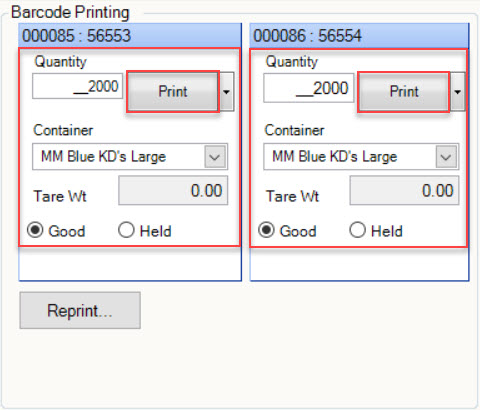
The Barcode Labels will be printed.
Note
To print and consume partial Barcode Labels, simply click on the drop-down arrow beside the  button and select Print & Consume Partial. The Partial Tags window will appear. Select the Partial Tags and click on the
  button.
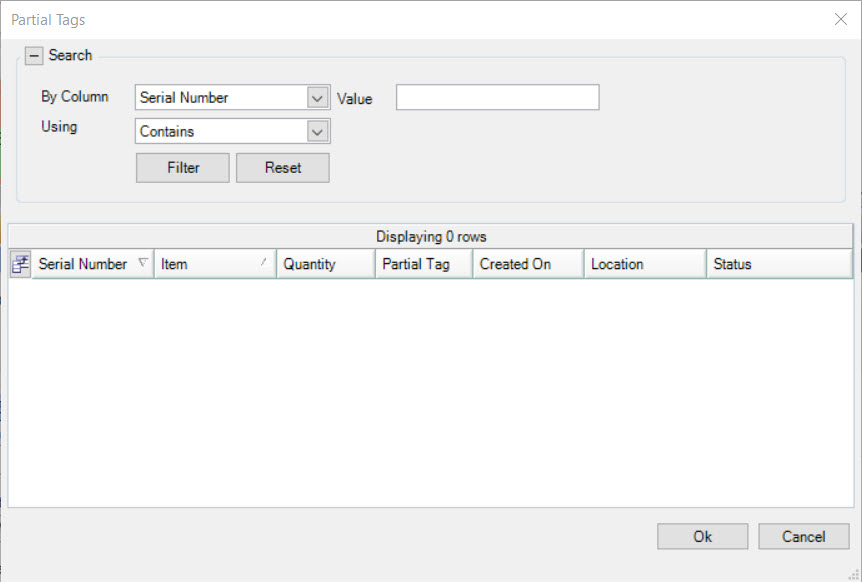
Two Barcode Labels with Two Masters Enabled
If there are two Barcode Labels to be printed with Master Labels enabled, the Job currently running is actually two linked Jobs with a Master Label selected on the Manufacture Routing screen. The Running Job Barcode Printing details tab would look like this:
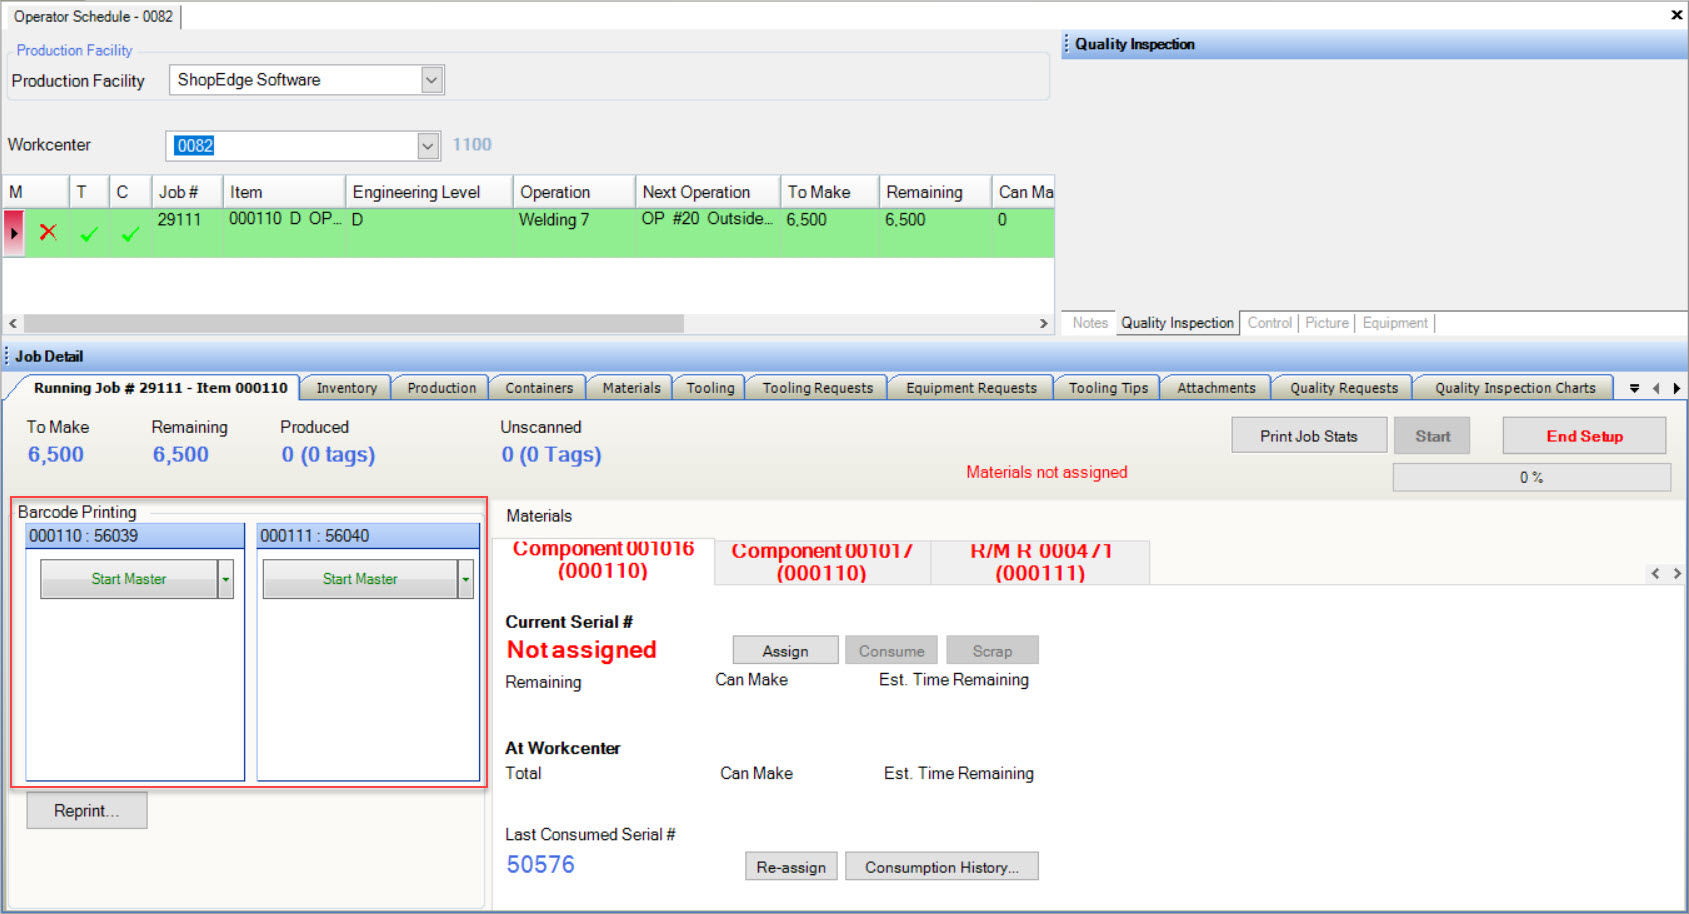
To print this type of Barcode Label, simply click on the  button for each Barcode. The Barcode Printing box will change.

To print the Master Barcodes, click on the  button for each Barcode. The Master will be printed.
To print the Tags, click on the  button. The Print Barcode Labels window will appear.

Enter in the appropriate information such as the # of Serial Numbers, Qty Per Container, and select the Container and Good/Held. Click on the  button.
The Tags will be printed.
Users also have the ability to end the Master by clicking on the  button. The End Master window will appear.

Verify the number of Containers and Total Quantity of the Master Label. Click on the  button once the necessary fields are verified.
The Master Labels will end.
Note
Users have the ability to edit the Master by clicking on the drop-down arrow beside the  button. The End Master window will appear where users can edit and/or verify Containers and the Total Quantity. Click on the
  button when you are finished.
Re-printing Tags
The system allows users to have the ability to re-print if necessary.
To do so, simply click on the  button located on the Running Job Barcode Printing details tab.
The Re-print Tag window will appear. Select the Tag you wish to re-print and click on the  button.
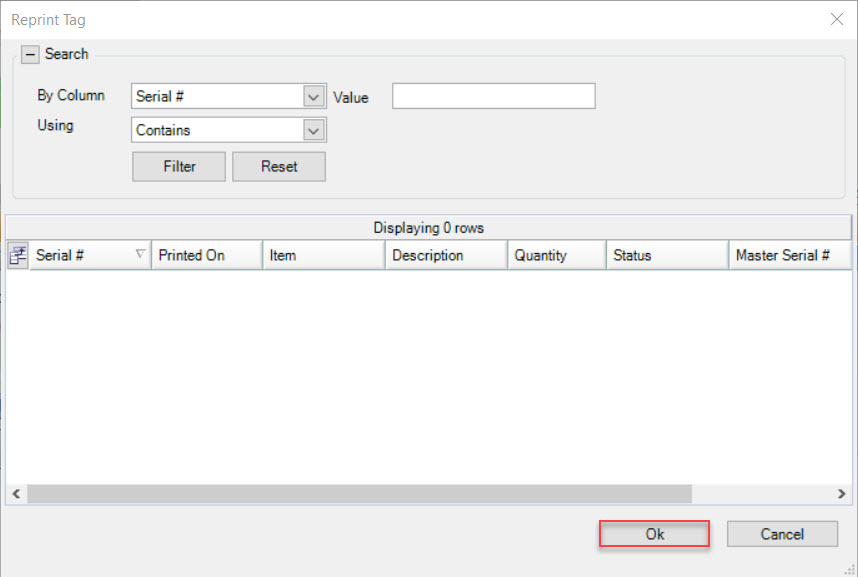
The selected Tag(s) will be re-printed.
Inventory Tab
The Inventory details on the Operator Schedule can be viewed by clicking on the  tab.
tab.
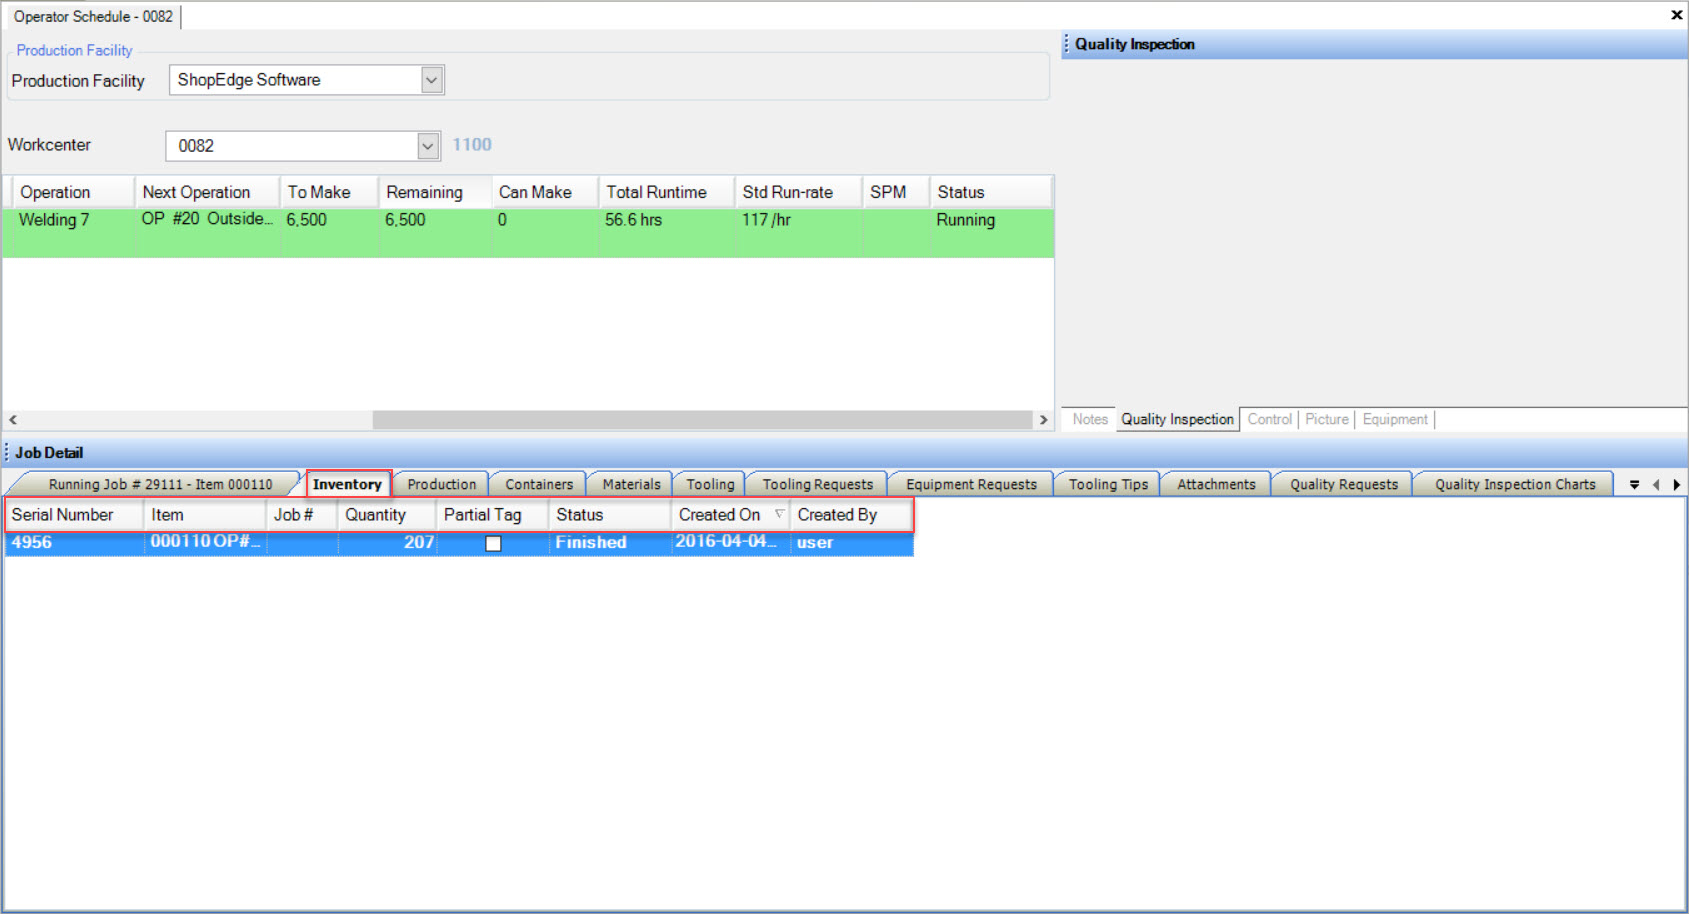
Users will be able to view all of the WIP Material Inventory related to the current Running Job.
Details include the Serial Number, Item, Job #, Quantity, whether or not it is a Partial Tag, the Status, Created On date, and who it was Created By.
Production Tab
The Production details on the Operator Schedule can be viewed by clicking on the  tab.
tab.
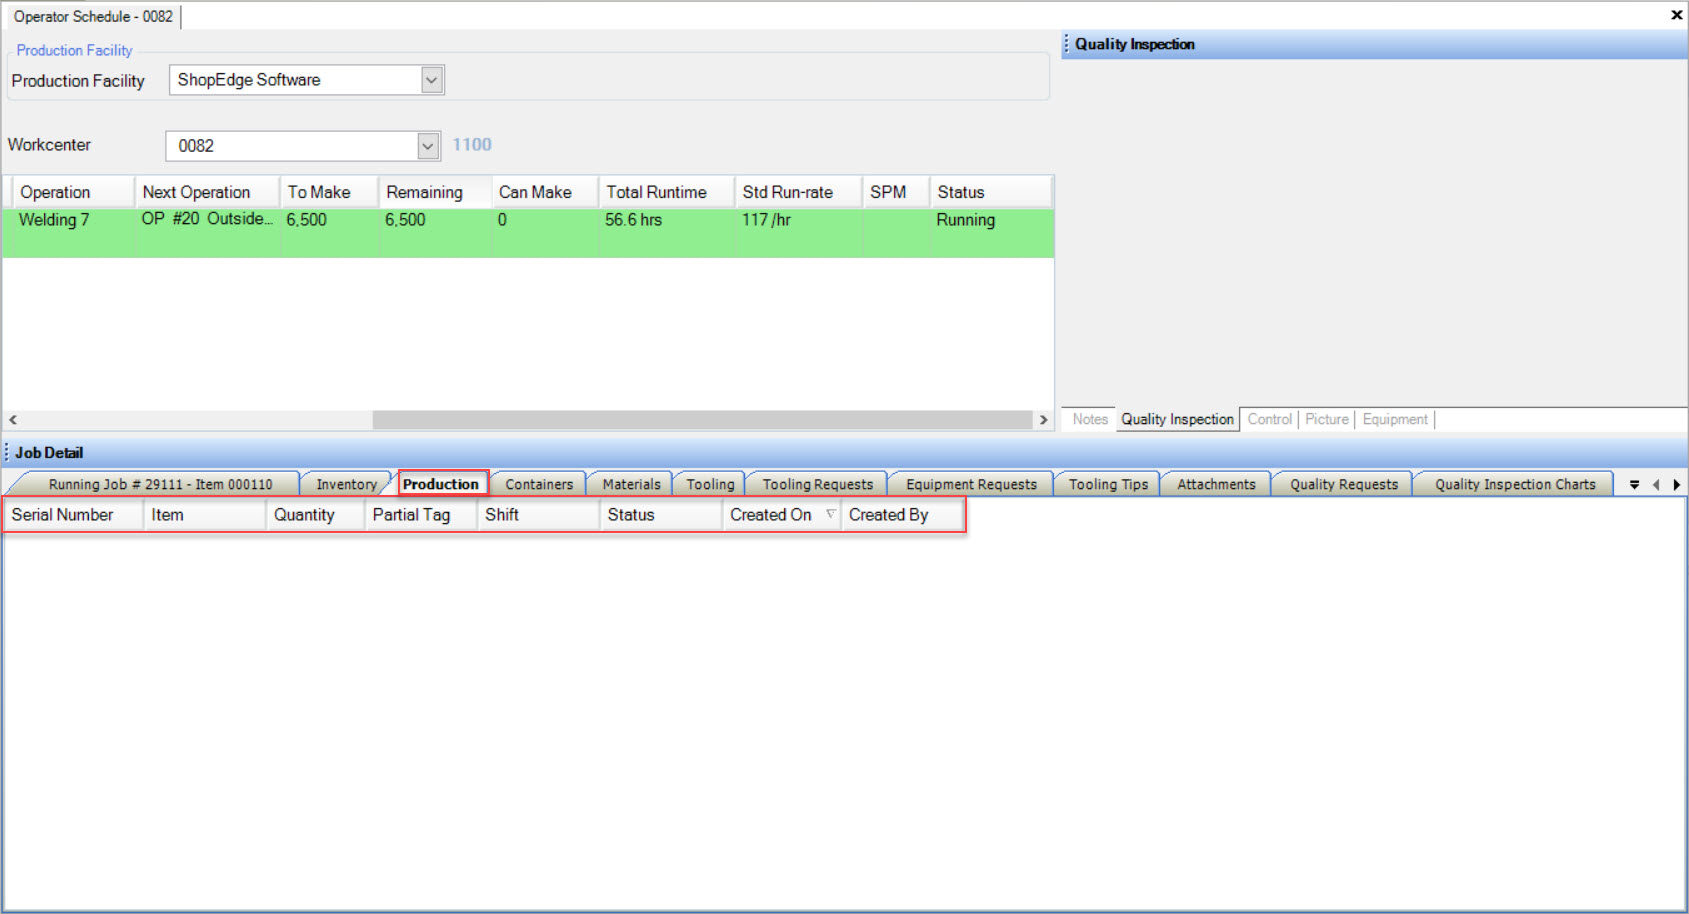
Users will be able to view details in regards to Running or Completed Jobs. The system tracks Tags that have been produced at the selected Workcenter.
Details include the Serial Number, Item, Quantity, whether or not it is a Partial Tag, the Shift, Status, Created On date, and who it was Created By.
Containers Tab
The Container details on the Operator Schedule can be viewed by clicking on the  tab.
tab.
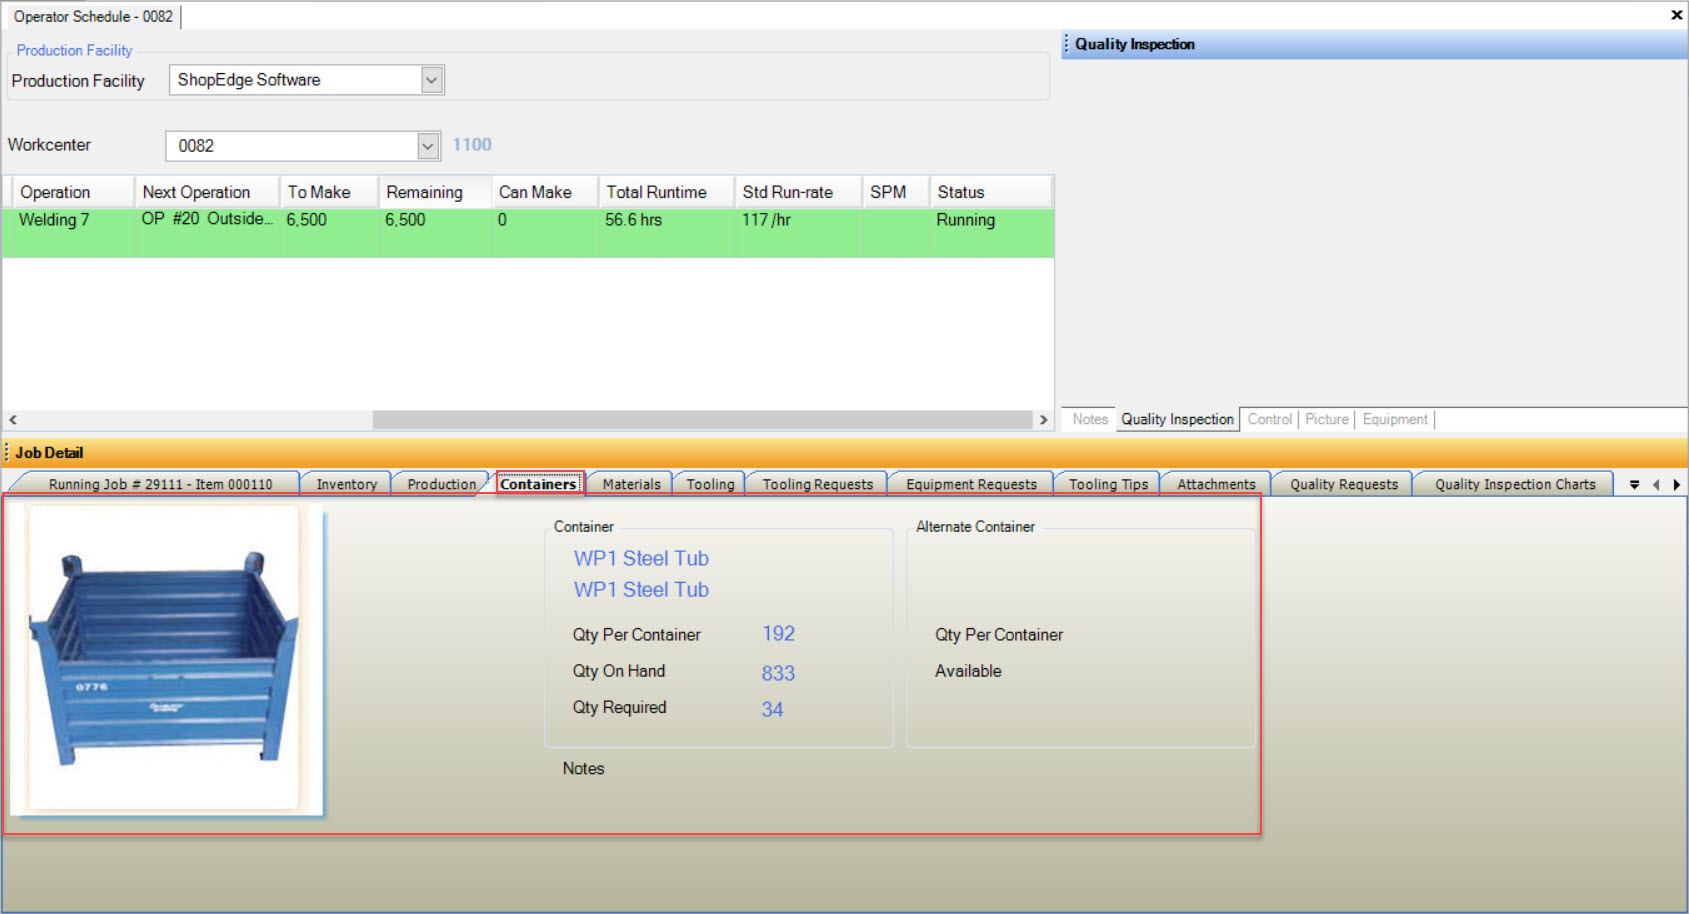
Users will be able to view a Container picture (if available), Container details such as the Qty Per Container, Qty On Hand, and Qty Required. Alternate Container details (if available) include information such as the Qty Per Container and the Availability. The Container details will also include any Notes where applicable.
Note
Details regarding Containers are attached to Jobs on the Manufacture Routing screen under the  button.
Materials Tab
Material details on the Operator Schedule can be viewed by clicking on the  tab.
tab.
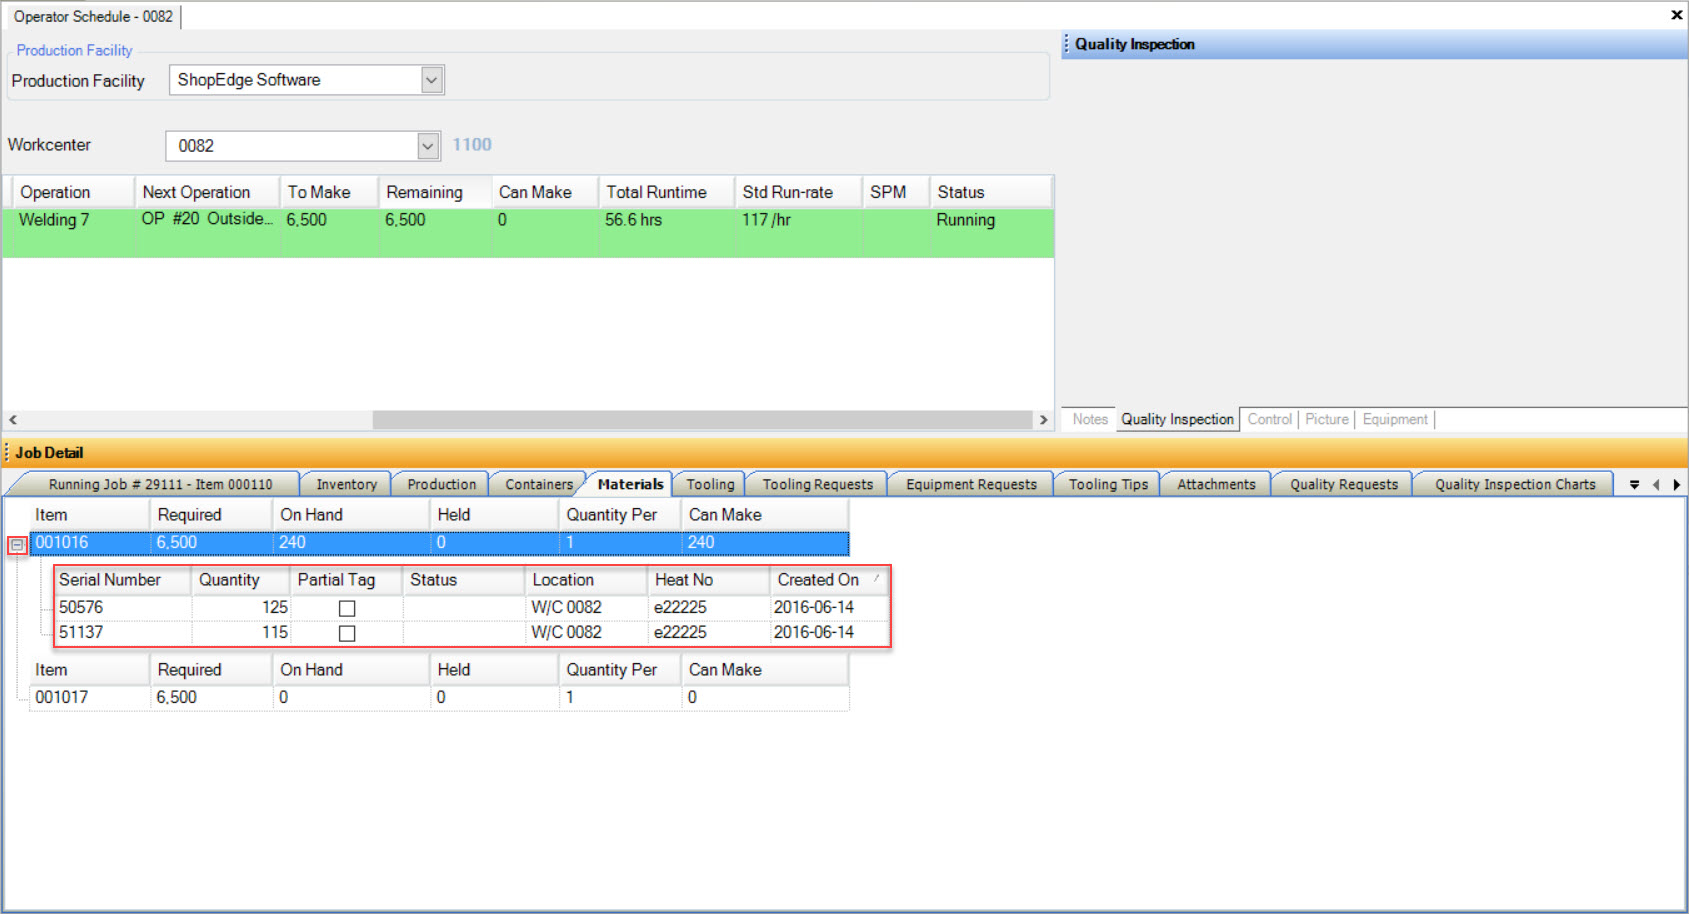
Users will be able to view the Materials that are linked to a Job in order to complete it. Details include the Item, amount Required, On Hand, Held, Quantity Per, and Can Make amount.
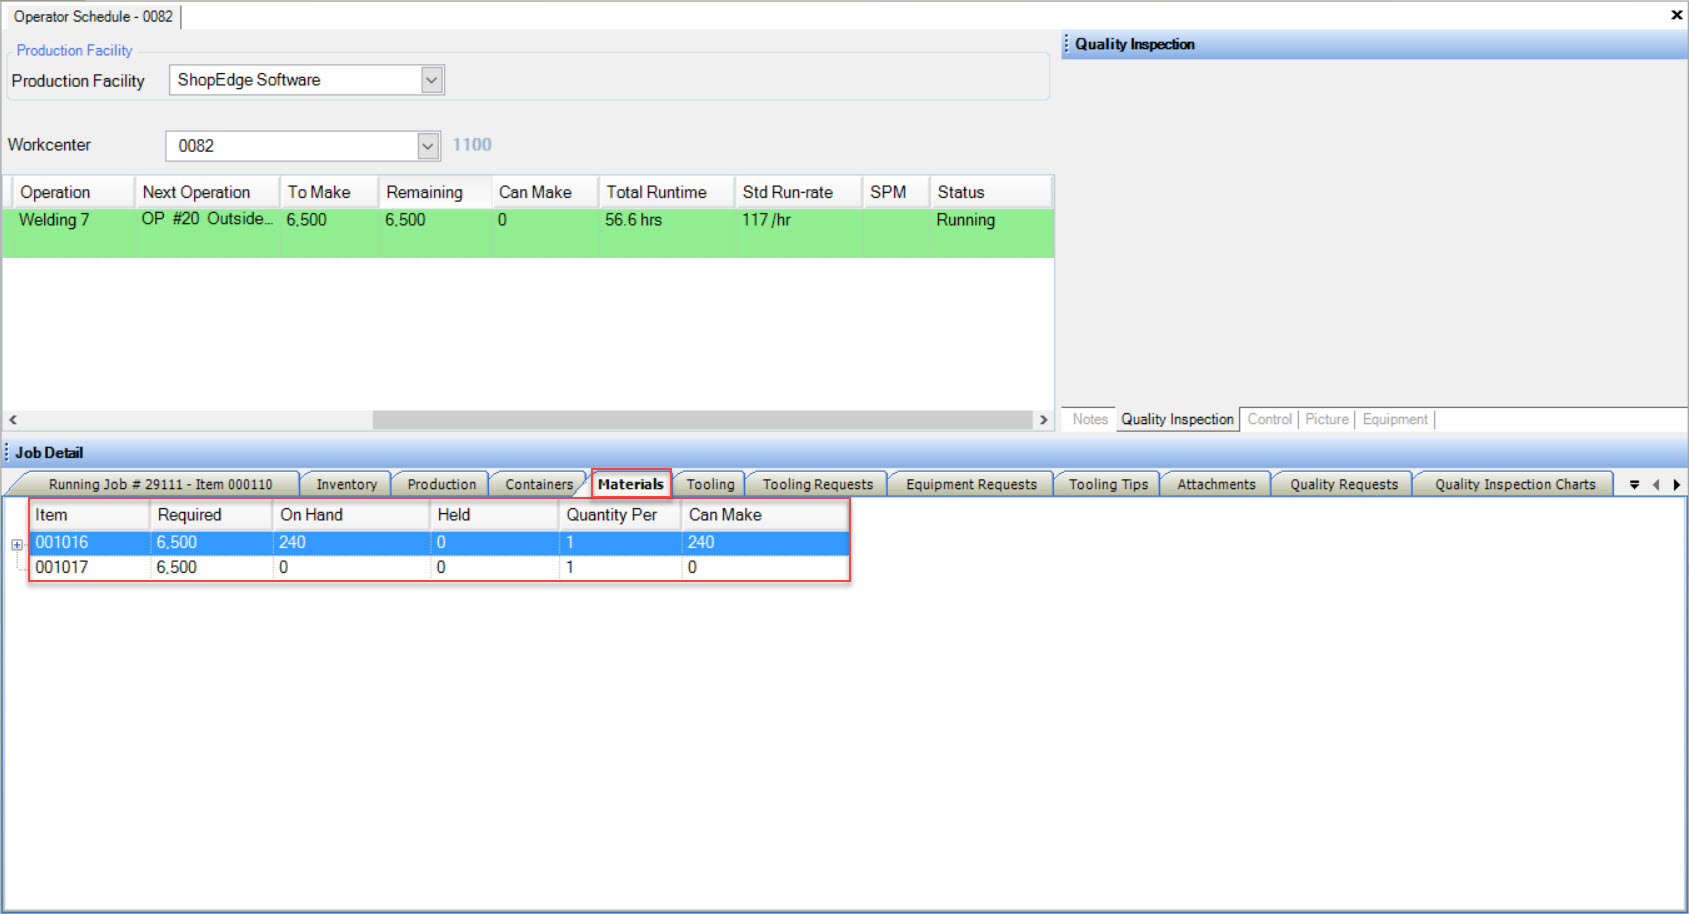
If users wish to view more details such as the Serial Number, Quantity, whether or not it is a Partial Tag, the Status, Location, Heat No., and the Created On date, simply click on the plus sign button (where applicable) to expand the details.
Tooling Tab
The Tooling details on the Operator Schedule can be viewed by clicking on the  tab.
tab.
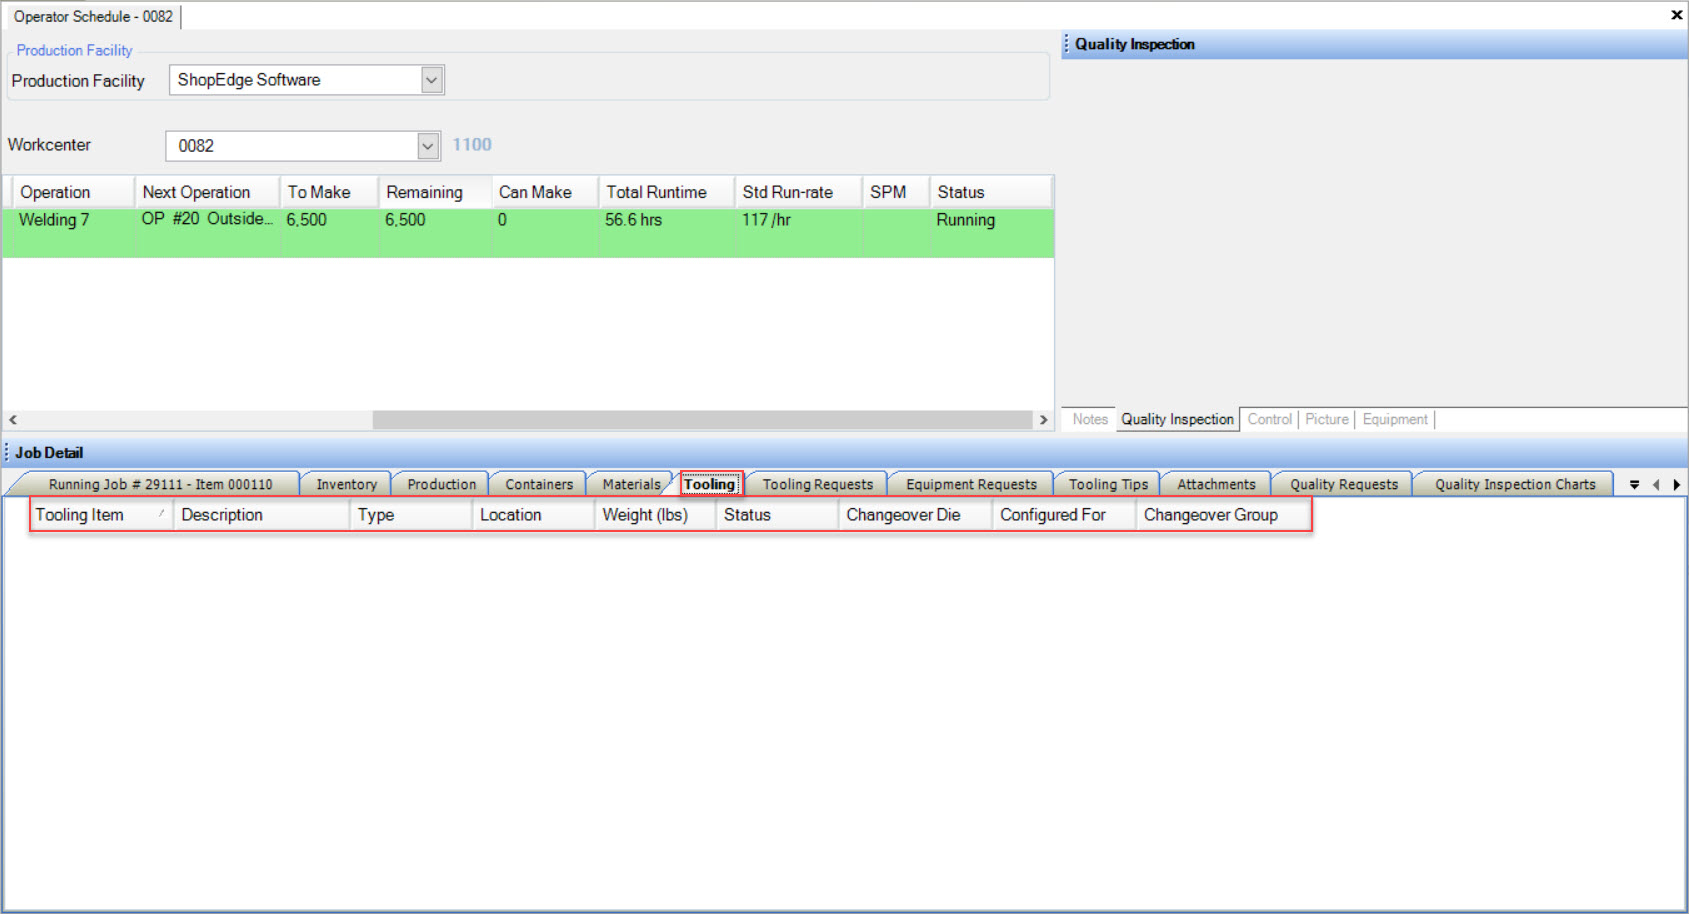
Users will be able to view all of the Tooling Items that are required for the Running Job. Details include the Tooling Item, Description, Type, Location, Weight (lbs.), Status, Changeover Die, Configured For, and the Changeover Group.
Tooling Requests Tab
The Tooling Requests tab is used by Operators to record any issues regarding Items meeting specifications. As each Tooling Request is added to the list, they are then displayed in the Notes section below.
Tooling Request details on the Operator Schedule can be viewed by clicking on the  tab.
tab.
Users have the ability to create and add a Tooling Request in regards to any problems that occurred during the Production process with Tooling.
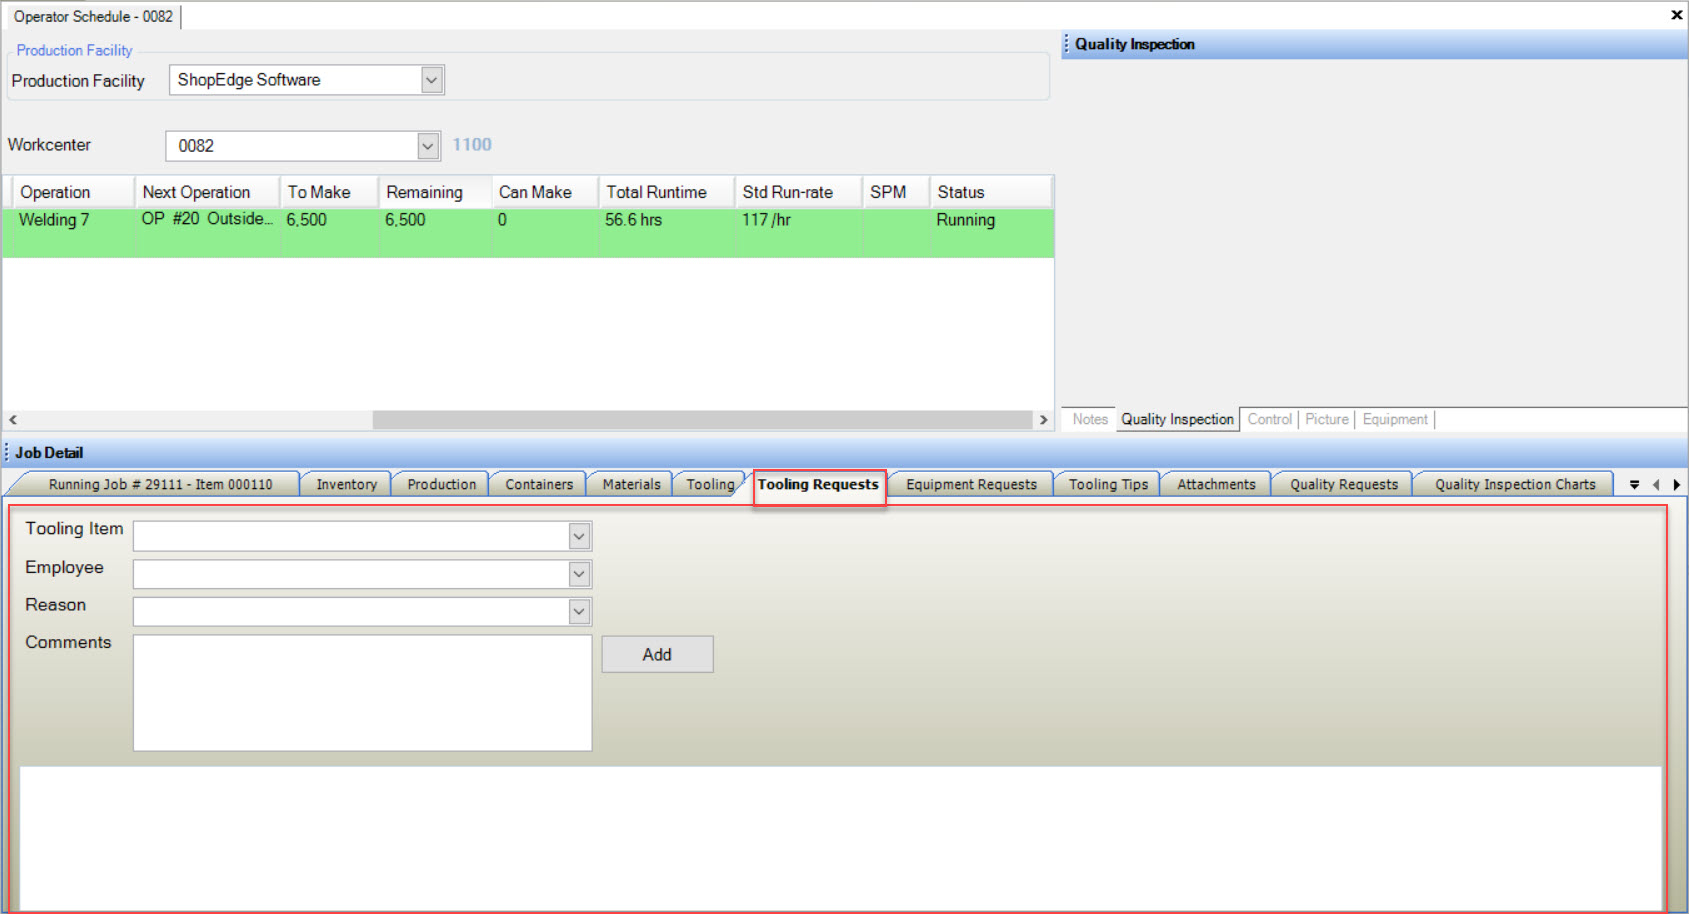
To create a Tooling Request, select a Tooling Item, Employee, and Reason using the available drop-down menus. Add in any necessary Comments.
To add the Tooling Request to the list below, click on the  button.
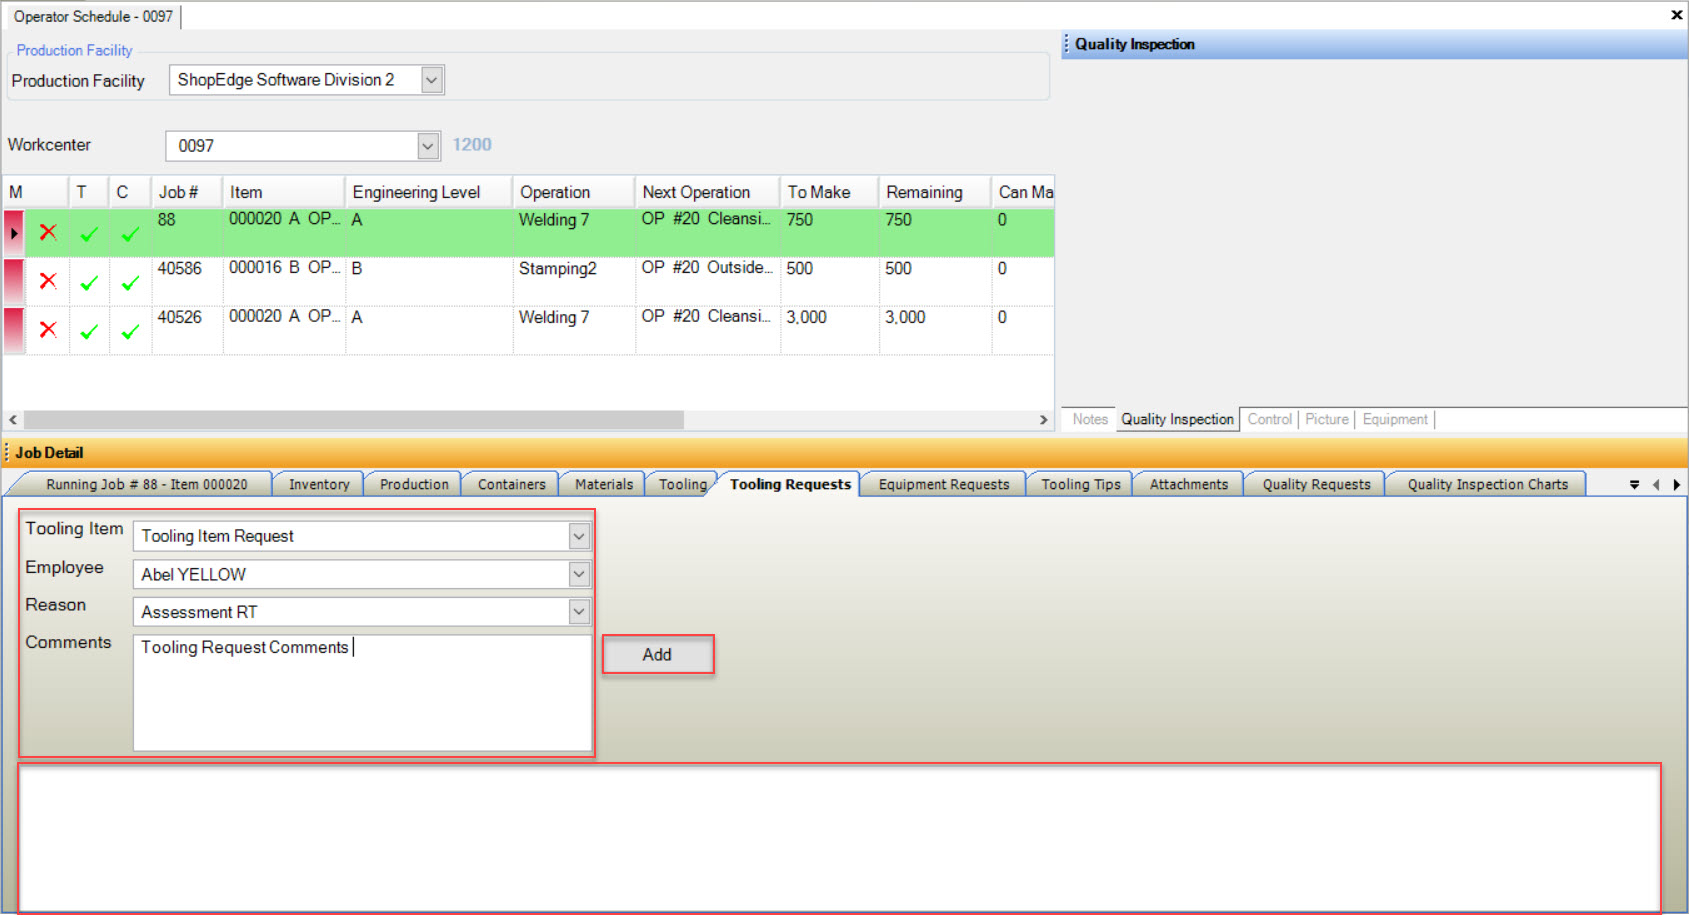
The Tooling Request will be added to the list below.
Note
If there have been any previous Tooling Requests, users will be able to view them in the list as well.
All Tooling Requests on the Operator Schedule are recorded and can be viewed in the Tooling module under the ![]() icon.
icon.
Note
Tooling Requests can also be created directly in the Tooling module under the ![]() icon.
icon.
Equipment Requests Tab
Equipment Request details on the Operator Schedule can be viewed by clicking on the  tab.
tab.
Users have the ability to create and add an Equipment Request in regards to any problems that occurred during the Production process with the Equipment.
To create an Equipment Request, select an Equipment Item, Employee, and Reason from the available drop-down menus. Then, enter in any notes for the Problem Description. To add the Equipment
Request, click on the  button.
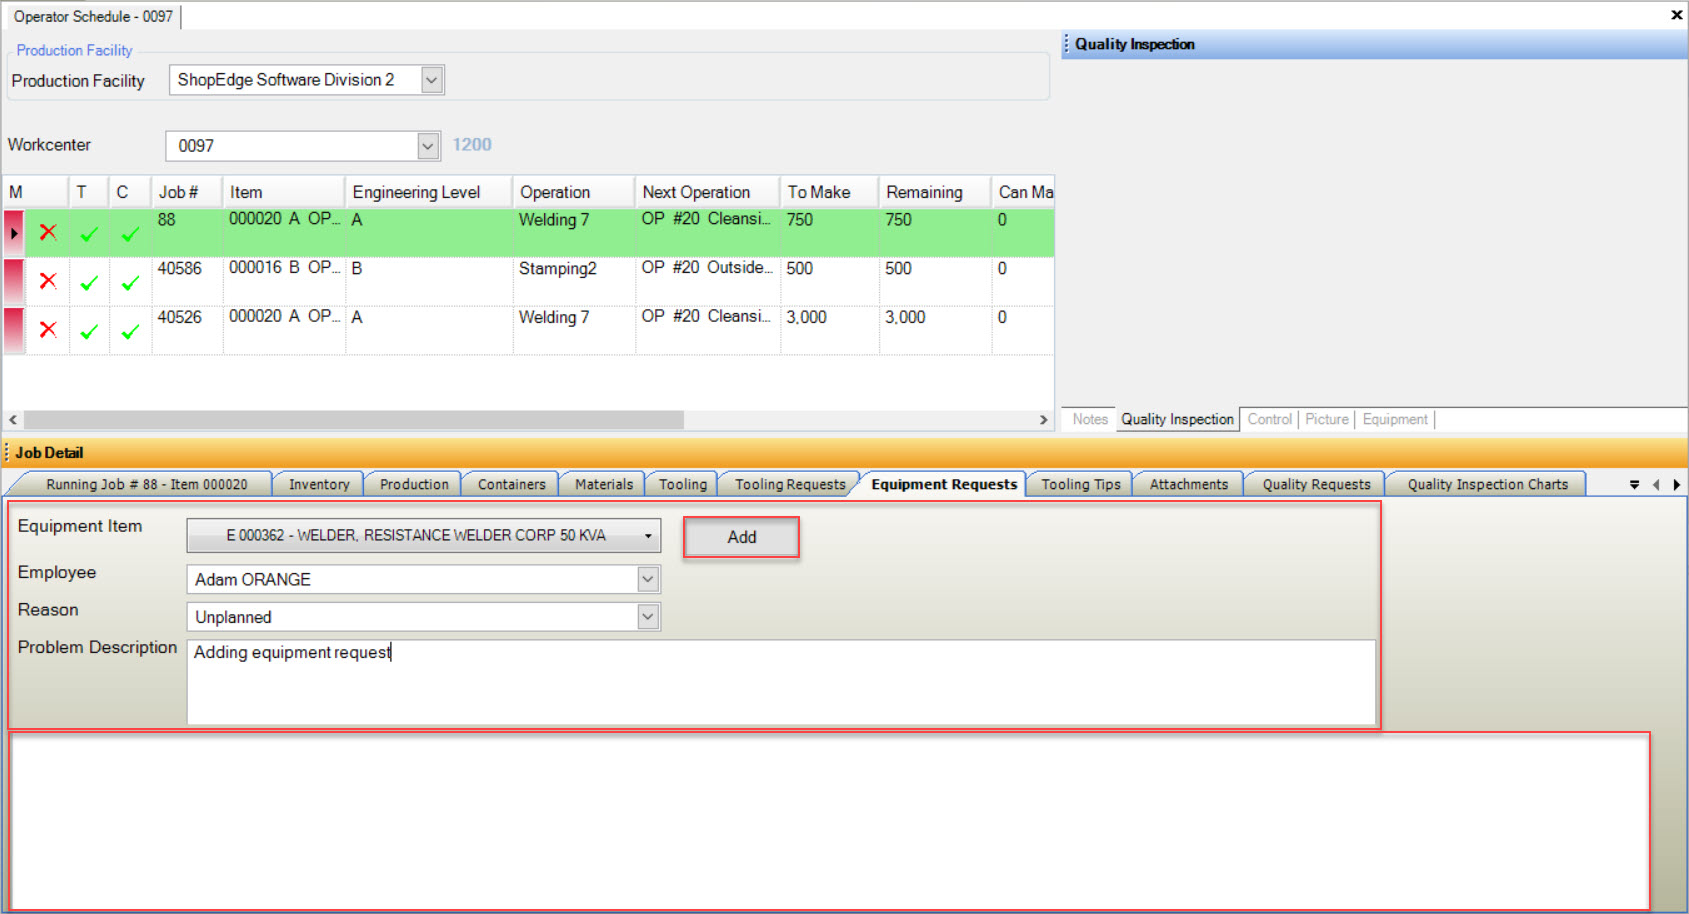
The Equipment Request will be added to the list below.
Note
If there have been previous Equipment Requests, users will be able to view them in the list as well.
Tooling Tips Tab
The Tooling Tips tab is a communication mechanism on how to deal with any Tooling issues or tips on how to run a Job at it’s maximum potential. The Tooling Tips stay in the display section until manually removed by a Tooling Manager under the Tooling Requests function.
Tooling Tips on the Operator Schedule can be viewed by clicking on the  tab.
tab.
Here, users have the ability to create and add Tooling Tips for future use in the Production process.
To create a Tooling Tip, select the Tool and Employee using the available drop-down menus and then enter in the Tip Description.
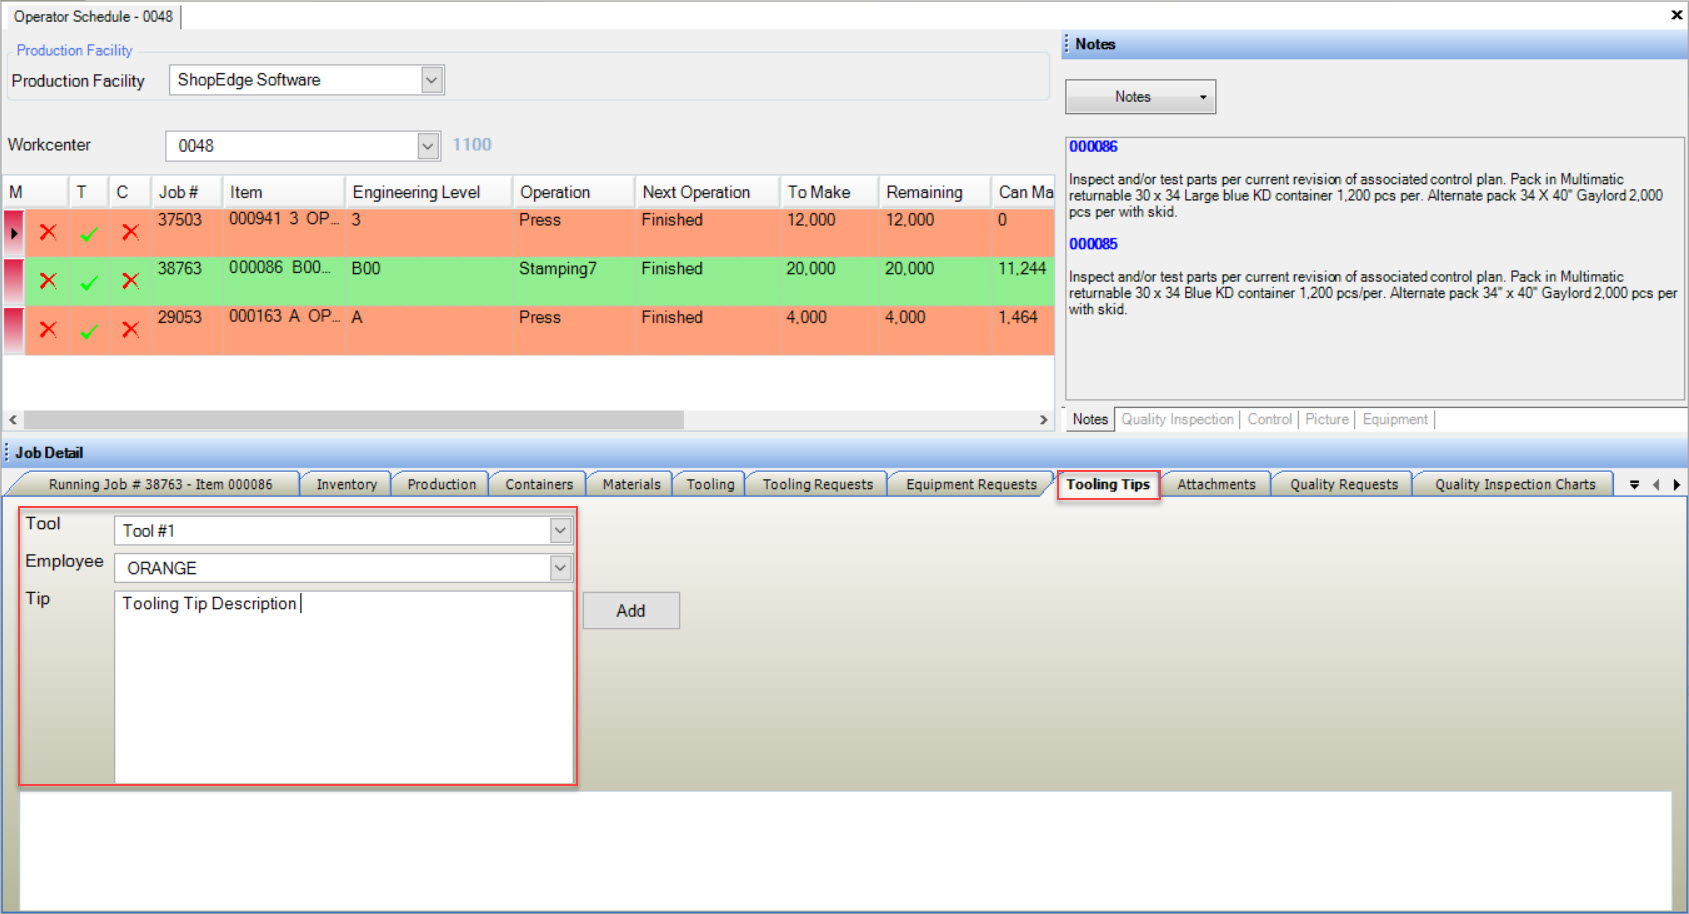
Next, click on the  button to add the Tooling Tip to the list below.
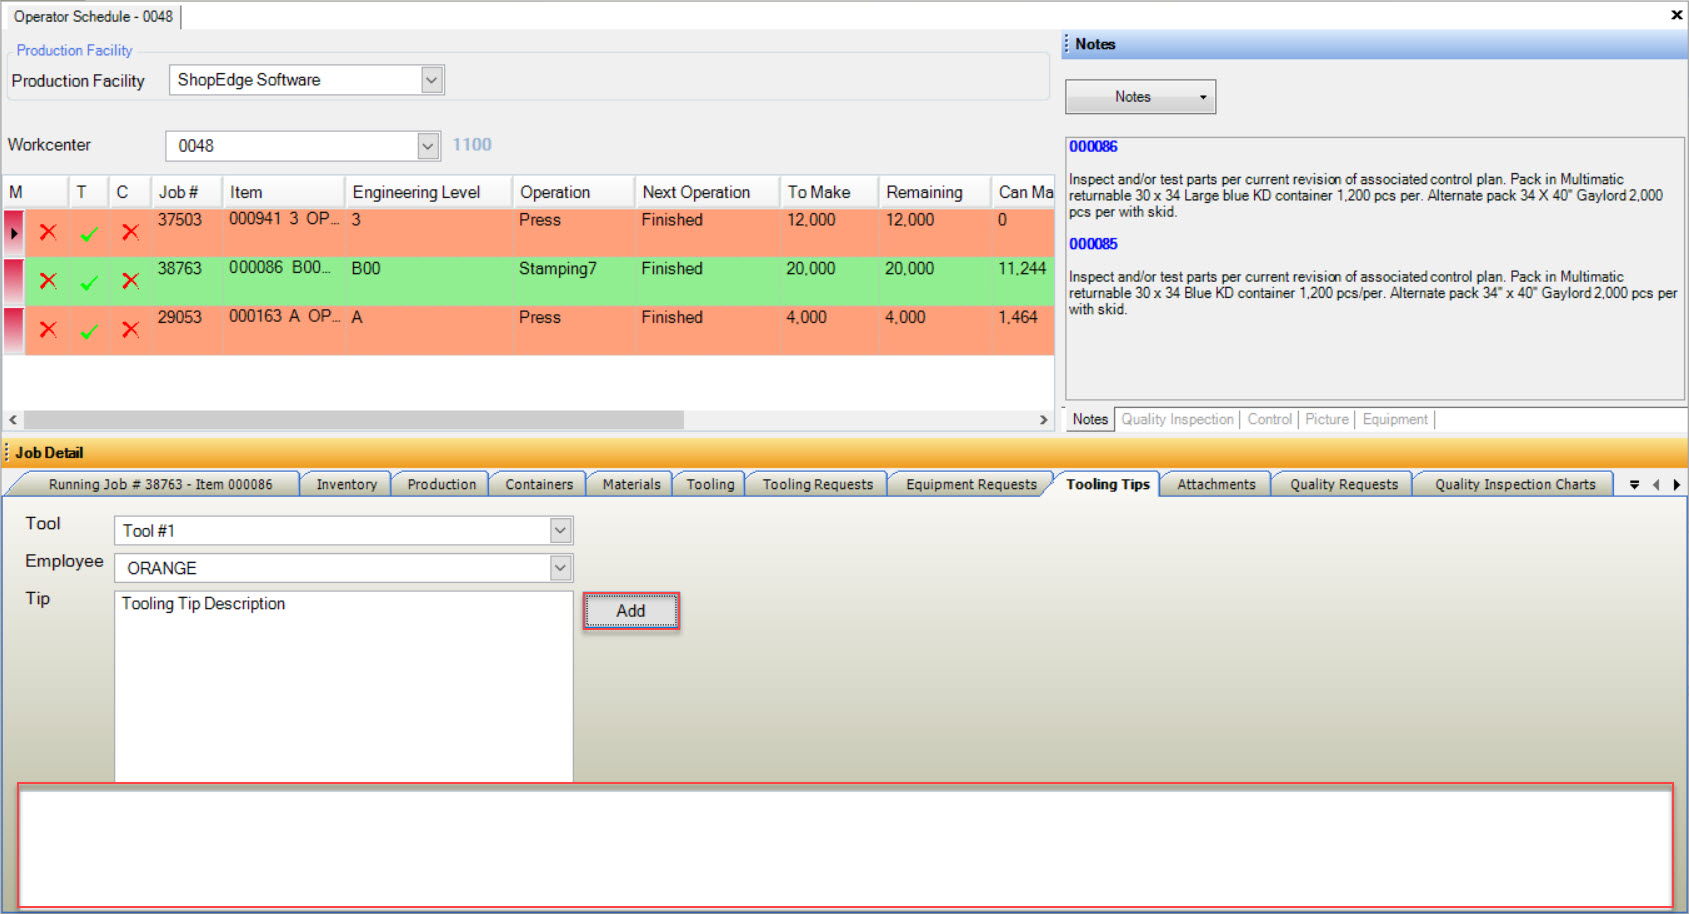
Note
If there have been previous Tooling Tips, users will be able to view them in the list as well.
Attachments Tab
The Attachment details on the Operator Schedule can be viewed by clicking on the  tab.
tab.
Users will be able to view all of the Attachments linked to the specific Job on the Workcenter. Any Attachments listed are added on the Manufacture Routing screen.
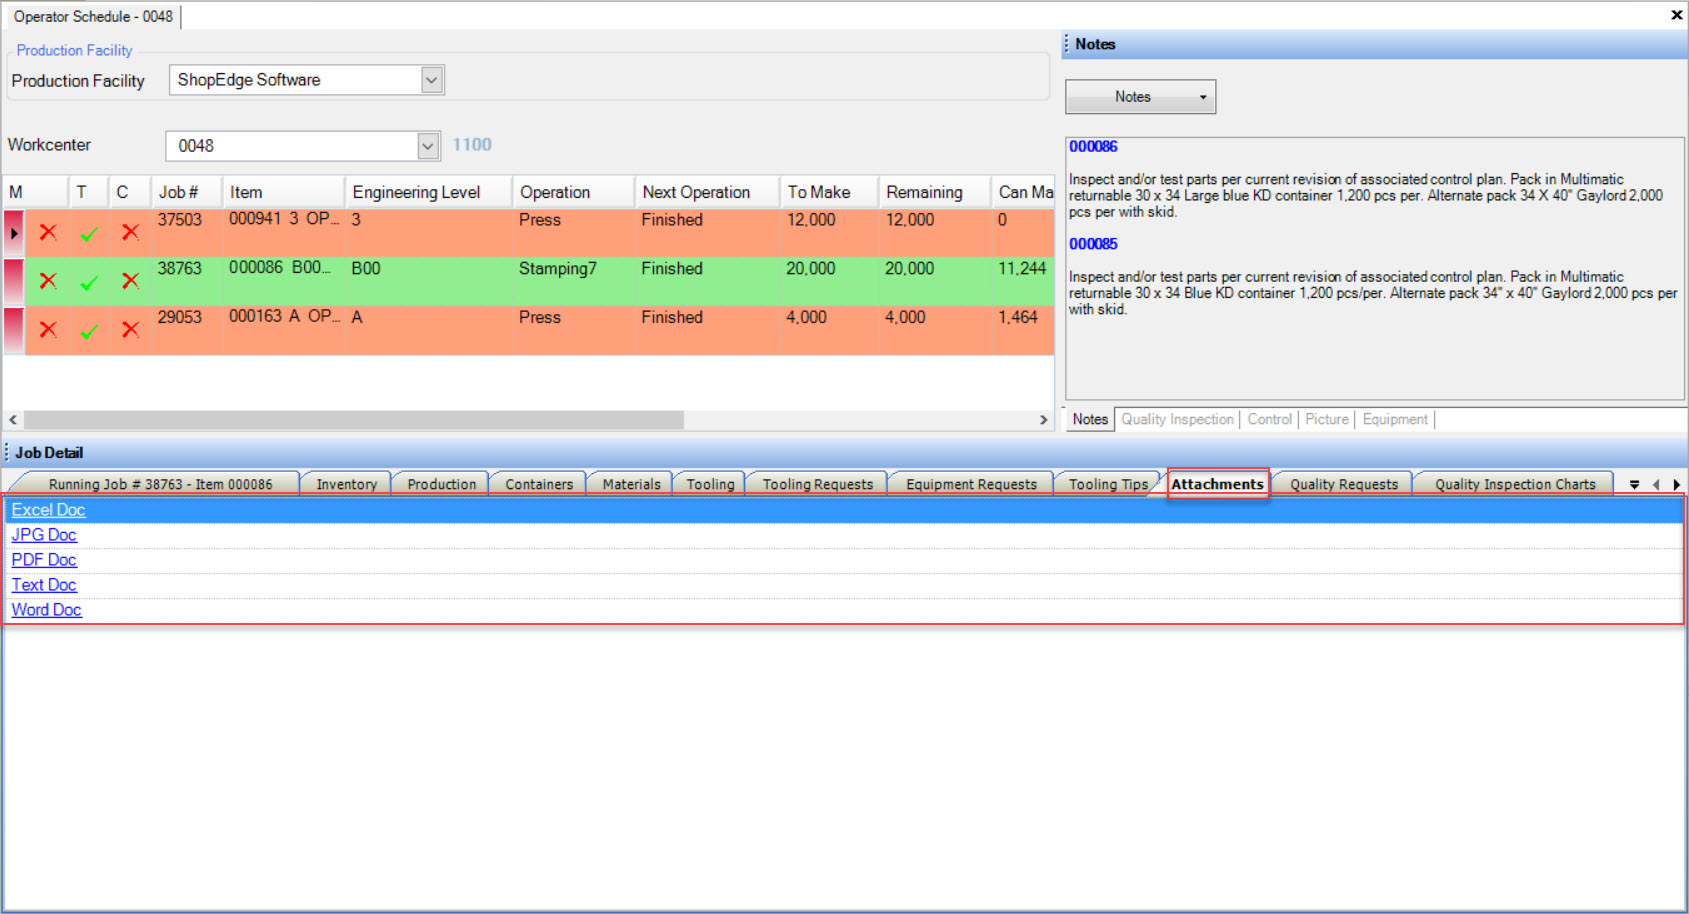
To open an Attachment, simply double-click on the appropriate Attachment Link and the Attachment will open. The Attachments will be formatted in Excel, JPG, PDF, Text, or Word.
Quality Requests Tab
Quality Requests on the Operator Schedule can be viewed by clicking on the  tab.
tab.
Here, users have the ability to create and add Quality Requests.
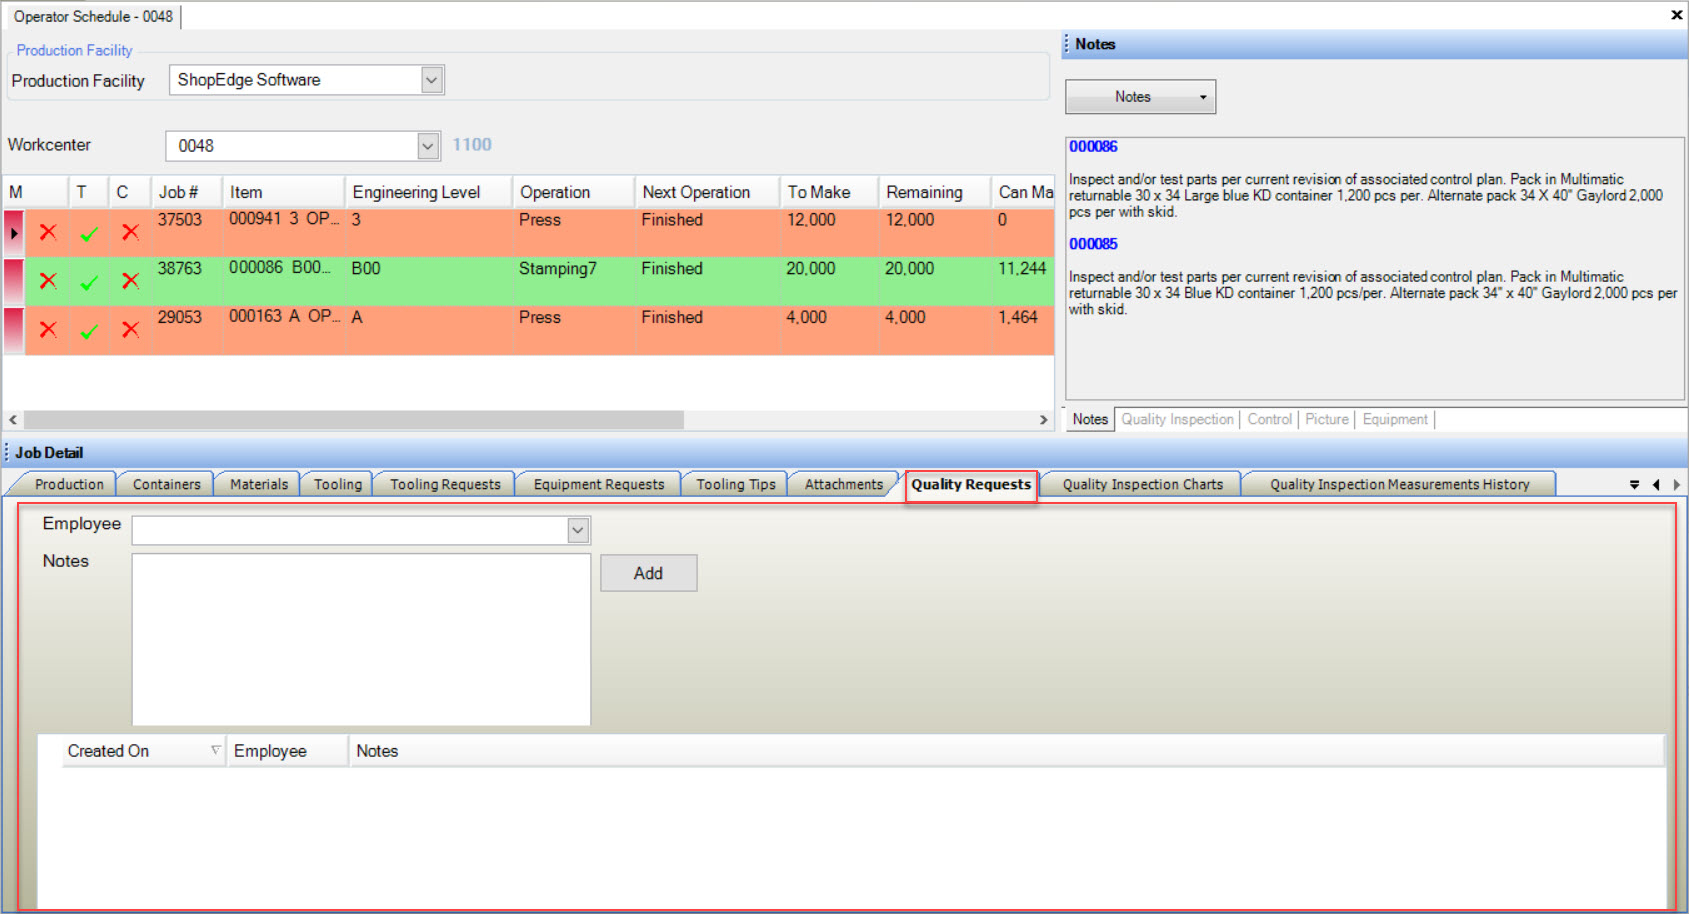
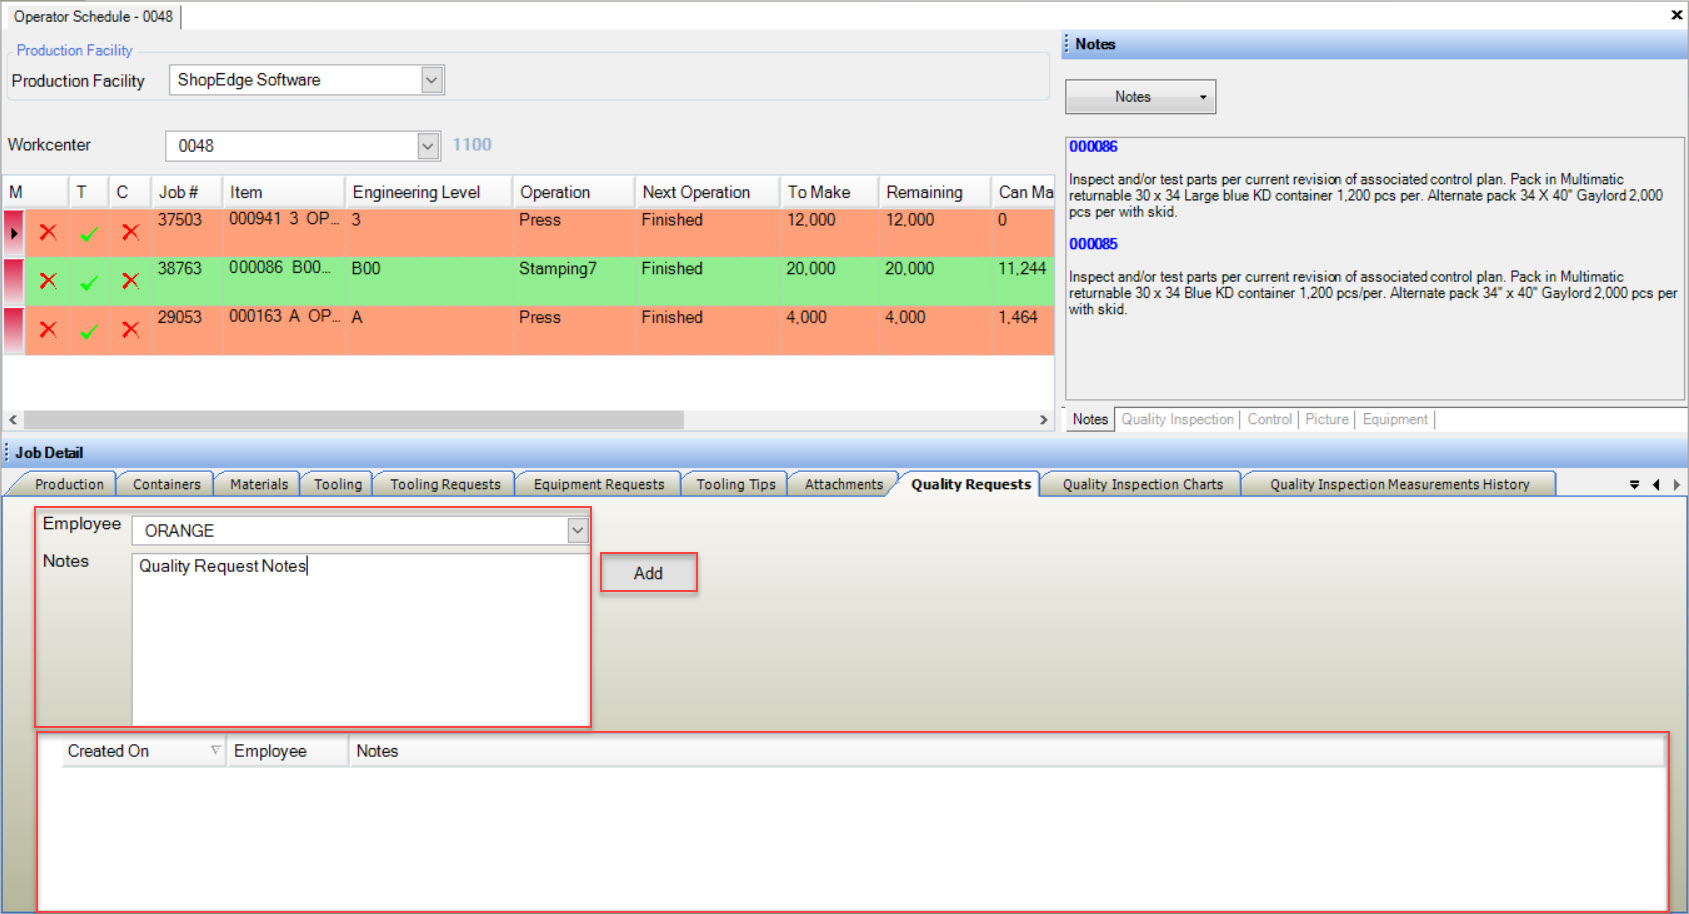
To create a Quality Request, select an Employee using the available drop-down menu and enter in any necessary Notes. Then, click on the  button to add the
Quality Request to the list below. Quality Requests are visible by the Quality Department.
Note
If there have been previous Quality Requests, users will be able to view them in the list as well.
Quality Inspection Charts Tab
The Quality Inspection Charts on the Operator Schedule can be viewed by clicking on the  tab.
tab.
Here, users will be able to view Quality Inspection Charts that are populated based on information entered at the Operator Level under the  tab
located in the Right Control Panel on the Operator Schedule screen.
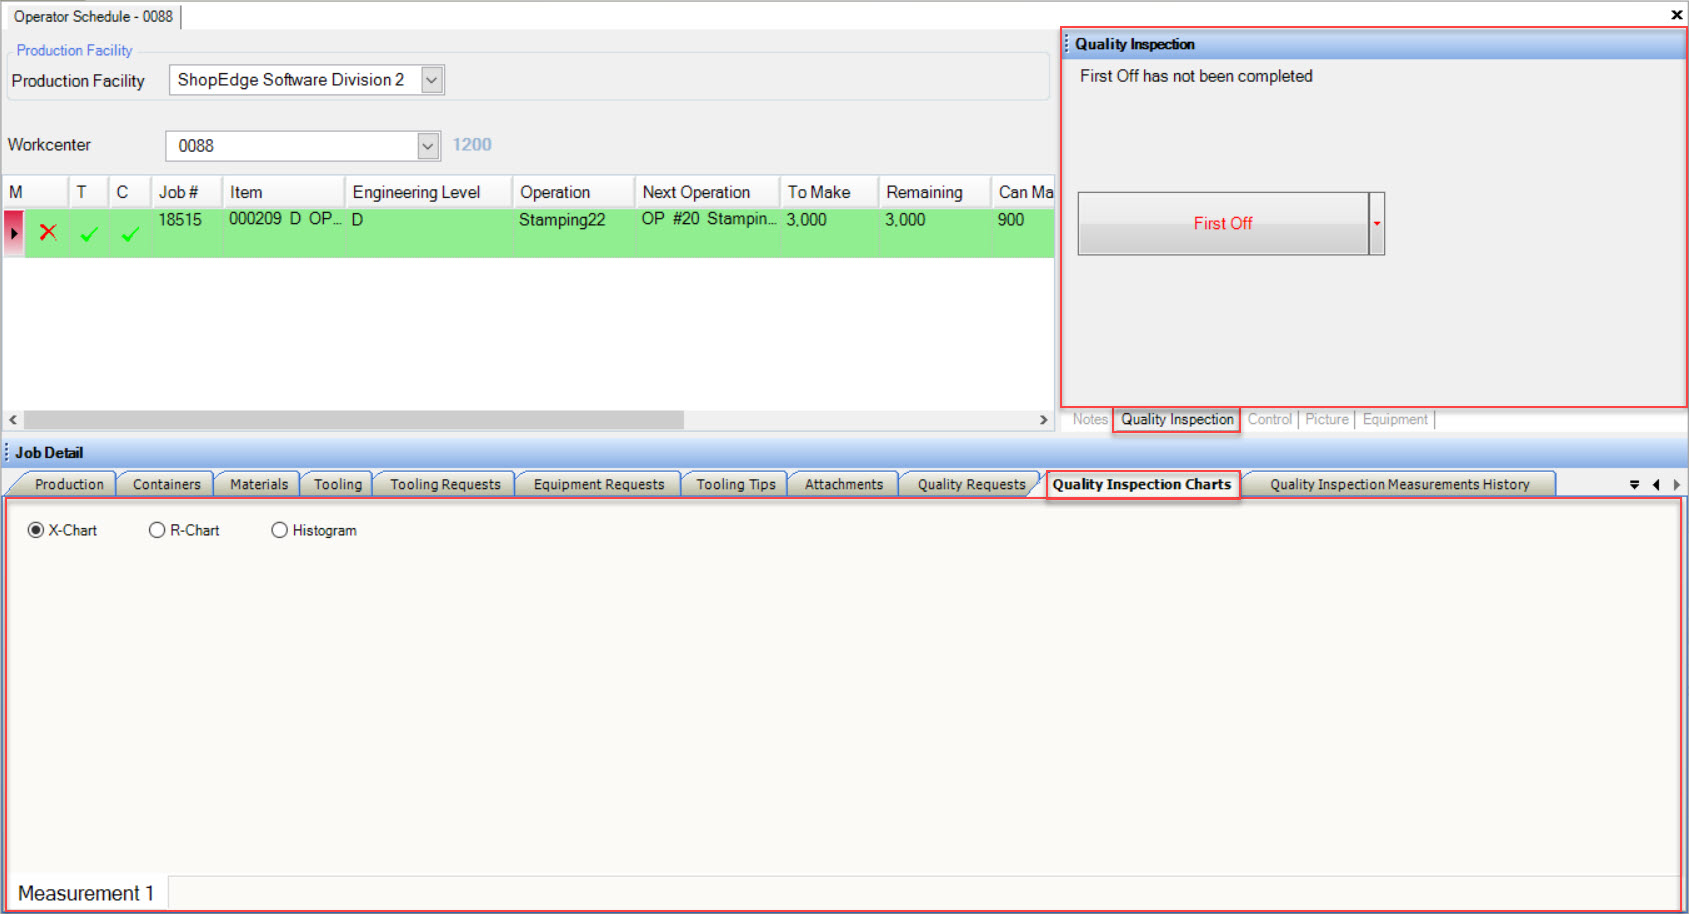
The Quality Inspection Charts can be viewed in three different formats: X-Chart, R-Chart, or a Histogram.
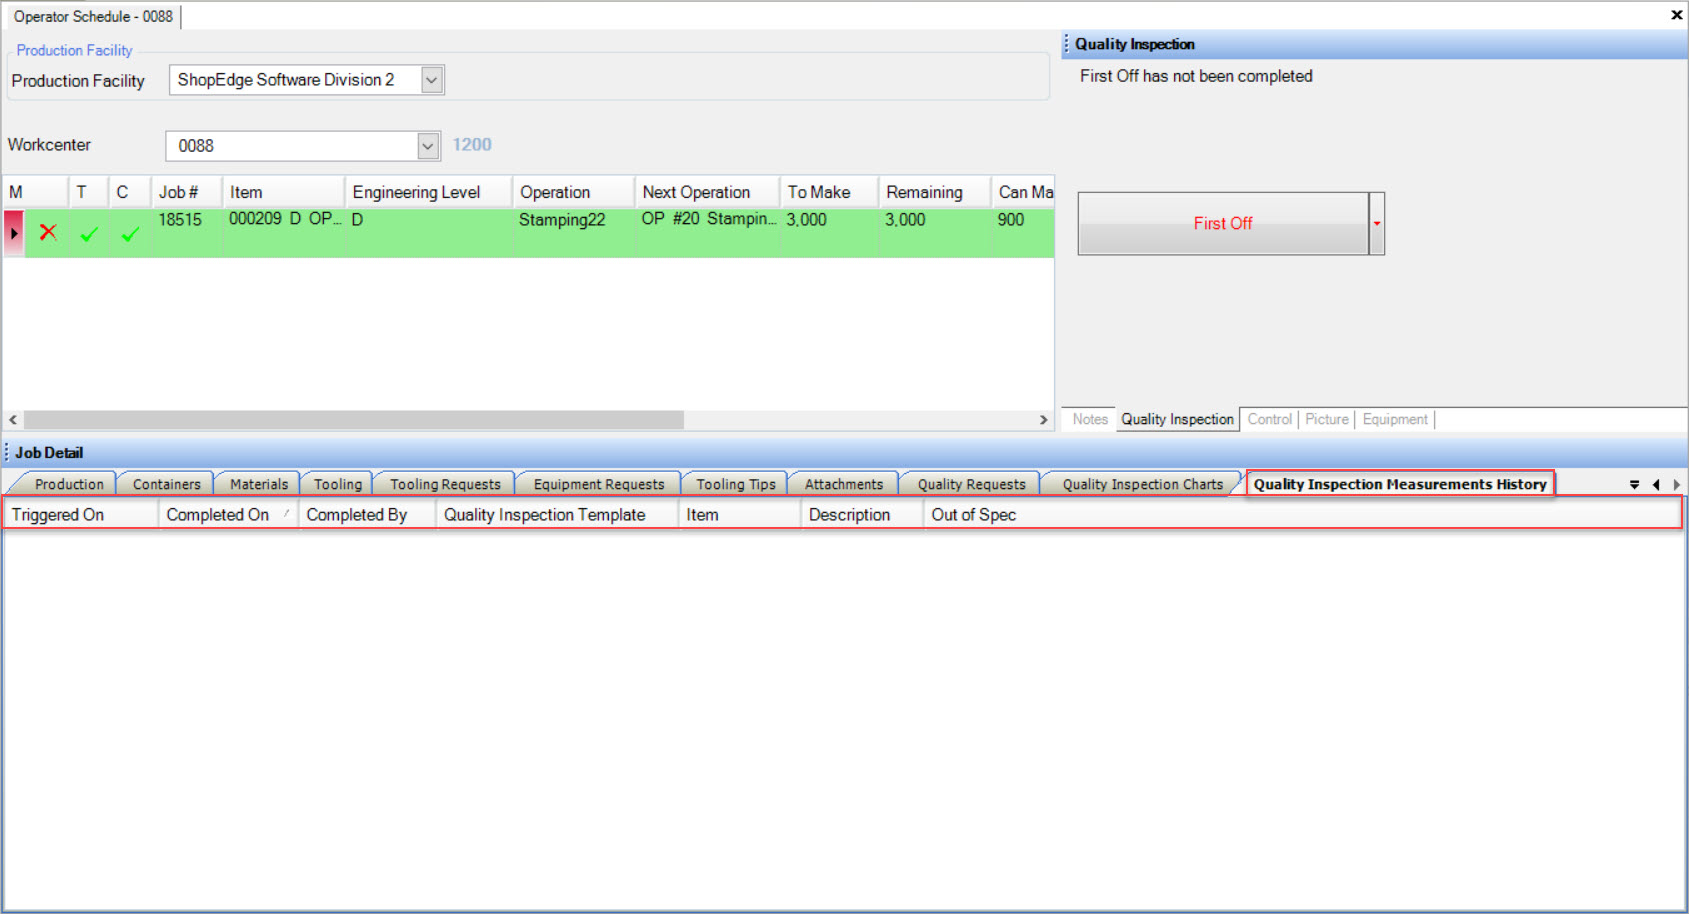
Quality Inspection Measurements History Tab
The Quality Inspection Measurements History details on the Operator Schedule can be viewed by clicking on the  tab.
tab.
Here, users will be able to view the history for all of the Quality Inspection Measurements captured for a particular Item for a Job. Details about the Quality Inspection Measurements include the Triggered On date, Completed On date, Completed By date, Quality Inspection Template, Item, Description, and Out of Spec.
